Page Deprecated
Information you find on this page may be out of date and no longer accurate.
JupyterLab
An extensible environment for interactive and reproducible computing, based on the Jupyter Notebook and Architecture. JupyterLab Homepage
Available Modules
module load JupyterLab/2025.3.0-foss-2023a-4.3.5Warning
This documentation contains our legacy instructions for running
JupyterLab by tunnelling through the lander node.
If you are a Mahuika cluster user, we recommend using Jupyter via jupyter.nesi.org.nz.
Follow this link for more
information
NeSI provides a service for working on Jupyter Notebooks. As a first step JupyterLab can be used on Mahuika nodes. JupyterLab is a single-user web-based Notebook server, running in the user space. JupyterLab servers should be started preferably on a compute node, especially for compute intensive or memory intensive workloads. For less demanding work the JupyterLab server can be started on a login or virtual lab node. After starting the server your local browser can be connected. Therefore port forwarding needs to be enabled properly. The procedure will be simplified in future, but now require the following steps, which are then described in more details:
Launch JupyterLab
Since JupyterLab is a web based application, and at NeSI launched behind the firewall, a port needs to be forwarded to your local machine, where your browser should connected. This ports are numbers between 2000 and 65000, which needs to be unique on the present machine. The default port for JupyterLab is 8888, but only one user can use this at a time.
To avoid the need for modifying the following procedure again and again, we suggest to (once) select a unique number (between 2000 and 65000). This number needs to be used while establishing the port forwarding and while launching JupyterLab. In the following we use the port number 15051 (please select another number).
Setup SSH port forwarding
Prerequisite
- In the following we assume you already configured
your
.ssh/configto use two hop method as described in the Standard Terminal Setup.
First, the port forwarding needs to be enabled between your local machine and the NeSI system. Therewith a local port will be connected to the remote port on the NeSI system. For simplicity, we kept both numbers the same (here 15051). This can be specified on the command line in the terminal or using the MobaXterm GUI.
SSH Command Line
The ssh command need to be called with following arguments, e.g. for Mahuika:
ssh -N -L 15051:localhost:15051 mahuika
Here -N means "Do not execute a remote command" and -L means "Forward Local Port".
Tips
For Maui_Ancil, e.g. w-mauivlab01 you may want to add the
following to your .ssh/config to avoid establishing the
additional hop manually.
ssh
 Host maui_vlab
     User <username>
     Hostname w-mauivlab01.maui.niwa.co.nz
     ProxyCommand ssh -W %h:%p maui
     ForwardX11 yes
     ForwardX11Trusted yes
     ServerAliveInterval 300
     ServerAliveCountMax 2
<username> needs to be changed. Hostnames can be adapted for
other nodes, e.g. w-clim01
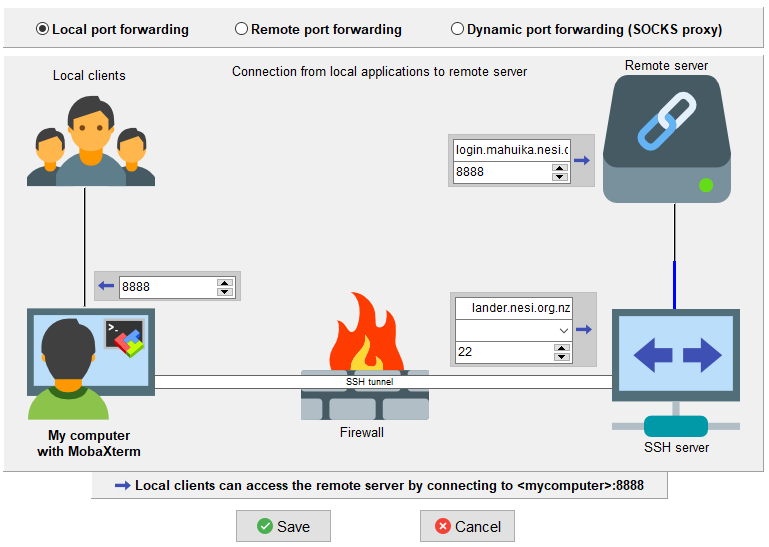
MobaXterm GUI
Tips
MobaXterm has an internal terminal which acts like a linux terminal and can be configured as described in the Standard Terminal Setup. There with the SSH command line approach above can be used.
MobaXterm has a GUI to setup and launch sessions with port forwarding, click 'Tools > MobaSSH Thunnel (port forwarding)':
- specify the lander.nesi.org.nz as SSH server address (right, lower box, first line)
- specify your user name (right, lower box, second line)
- specify the remote server address, e.g. login.mahuika.nesi.org.nz (right, upper box first line)
- specify the JupyterLab port number on the local side (left) and at the remote server (right upper box, second line)
- Save
Launch the JupyterLab server
After successfully establishing the port forwarding, we need open another terminal and login to the NeSI system in the usual way, e.g. opening a new terminal and start another ssh session:
ssh mahuika
On the Mahuika login node, load the environment module which provides JupyterLab:
module load JupyterLab
Or alternatively, and particularly if you are using a Māui ancillary node instead of Mahuika, you can use the Anaconda version of JupyterLab instead:
module load Anaconda3
module load IRkernel  # optional
The JupyterLab server then can be started on the present node (login or virtual lab) or offloaded to a compute node. Please launch compute or memory intensive tasks on a compute node
On login nodes / virtual labs
For very small (computational cheap and small memory) the JupyterLab can be started on the login or virtual lab using:
jupyter lab --port 15051 --no-browser
Where, --port 15051 specifies the above selected port number and
--no-browser option prevents JupyterLab from trying to open a browser
on the compute/login node side. Jupyter will present output as described
in the next section including
the URL and a unique key, which needs to be copied in your local
browser.
On compute node
Especially notebooks with computational and memory intensive tasks should run on compute nodes. Therefore, a script is provided, taking care of port forwarding to the compute node and launching JupyterLab. A session with 60 min on 1 core can be launched using:
srun --ntasks 1 -t 60 jupyter-compute 15051 # please change port number
After general output, JupyterLab prints a URL with a unique key and the network port number where the web-server is listening, this should look similar to:
...
[C 14:03:19.911 LabApp]
  To access the notebook, open this file in a browser:
      file:///scale_wlg_persistent/filesets/project/nesi99996/.local/share/jupyter/runtime/nbserver-503-open.html
  Or copy and paste one of these URLs:
      http://localhost:15051/?token=d122855ebf4d029f2bfabb0da03ae01263972d7d830d79c4
The last line will be needed in the browser later.
Therewith the Notebook and its containing tasks are performed on a compute node. You can double check e.g. using
import os
os.open('hostname').read()
More resources can be requested, e.g. by using:
srun --ntasks 1 -t 60 --cpus-per-task 5 --mem 512MB jupyter-compute 15051
Where 5 cores are requested for threading and a total memory of 3GB.
Please do not use multiprocessing.cpu_count() since this is returning
the total amount of cores on the node. Furthermore, if you use
libraries, which implement threading align the numbers of threads (often
called jobs) to the selected number of cores (otherwise the performance
will be affected).
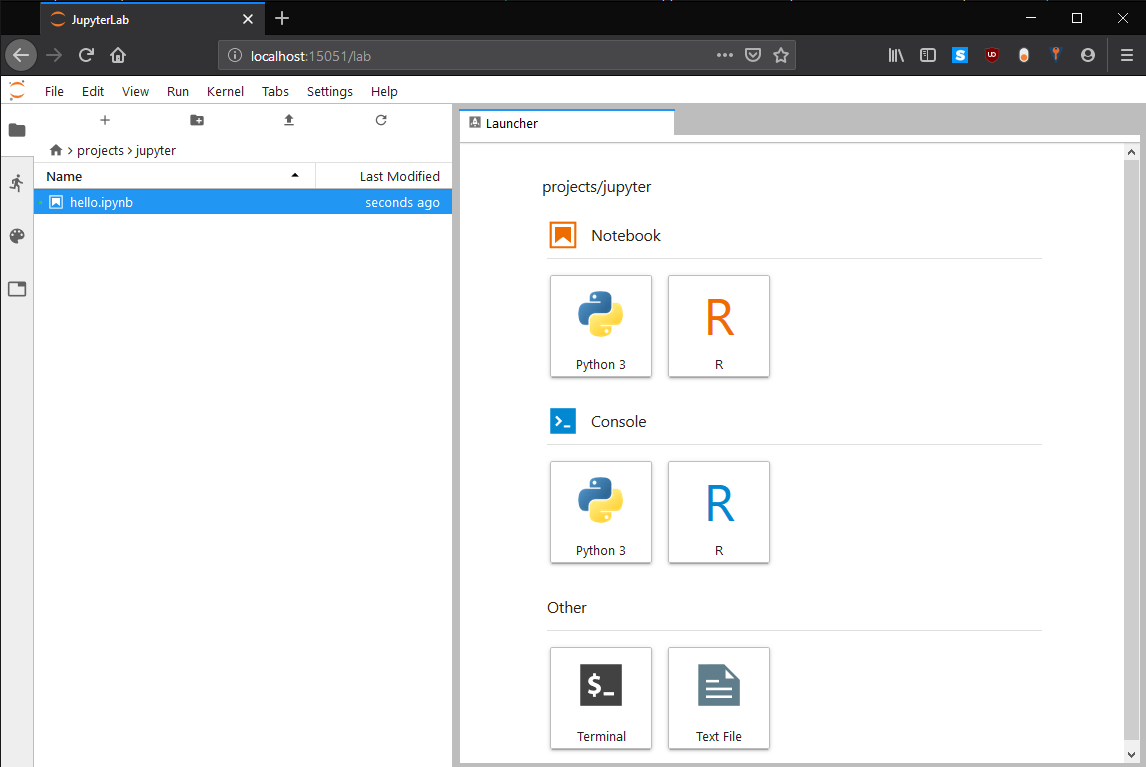
JupyterLab in your local browser
Finally, you need to open your local web browser and copy and paste the URL specified by the JupyterLab server into the address bar. After initializing Jupyter Lab you should see a page similar to:
Kernels
The following JupyterLab kernel are installed:
- Python3
- R
- Spark
R
verify that the module IRkernel is loaded
module load IRkernel
Spark
pySpark and SparkR is supported in NeSI Jupyter notebooks. Therefore, the module Spark needs to be loaded before starting Jupyter. Please run Spark workflows on compute nodes.
module load Spark
Packages
There are a long list of default packages provided by the JupyterLab
environment module (list all using !pip list) and R (list using
installed.packages(.Library), note the list is shortened).
Furthermore, you can install additional packages as described on the Python and R support page.