Page Deprecated
Information you find on this page may be out of date and no longer accurate.
TurboVNC
TurboVNC is a derivative of VNC (Virtual Network Computing) that is tuned to provide peak performance for 3D and video workloads. TurboVNC Homepage
Available Modules
module load TurboVNC/2.2.4-GCC-9.2.0Setup
0. Ubuntu only
You will also need java runtime
sudo apt install -y openjdk-11-jre
1. Download
Download TurboVNC here.
On Ubuntu, you can install the vnc-java package, e.g.:
sudo apt install vnc-java
Do not use gvncviewer, as it doesn't allow to connect to a VNC server available over a nonstandard port.
Usage
Setting a TurboVNC password
You can (and should) configure a TurboVNC password using the following commands:
module load TurboVNC
vncpasswd
The password should be between six and eight characters long. A password
shorter than six characters will be rejected; if the password is longer
than eight characters, only the first eight characters will be
considered. See man vncpasswd for more details.
The vncpasswd utility can also be used to set one-time use passwords,
as well as view-only passwords that you can set up to give people access
to your VNC session without allowing them to do things in your name.
Setting up the server on the cluster
Mahuika and Māui each have two login nodes. Therefore, if you logged in
to login.mahuika.nesi.org.nz (mahuika) or login.maui.nesi.org.nz
(maui), note whether you are working on mahuika01, mahuika02,
maui01 or maui02.
Having done that, run the following commands:
module load TurboVNC
vncserver
Warning
Do not use -securitytypes none as an argument to vncserver! If you
do so, anyone who has a cluster login and knows how to find a VNC
server in the list of processes can connect to your VNC server and
impersonate you. You are responsible for anything done on the
cluster under your user account.
You will receive a message
Desktop 'TurboVNC: mahuika01: (<username>)' started on display mahuika01:1
Note the display number (highlighted red). Also work out the server port number, which is 5900 + the display number. That is, if the display number is 1, the port will be 5901; if the display number is 2, the port will be 5902; and so on.
Connecting to the TurboVNC server from your workstation
Within the NIWA network (or NIWA VPN)
-
Open the TurboVNC viewer:
vncviewer -
Within the TurboVNC viewer, connect to the host and display number, e.g. to
mahuika01.mahuika.nesi.org.nz:1. Alternatively, use the host and port number:mahuika01.mahuika.nesi.org.nz::5901(note the two colons between hostname and port number).
Outside the NIWA network, and not on the NIWA VPN
-
Open an SSH tunnel through the lander node to the SSH port (22) on the desired login node:
# This command sets up local SSH port forwarding. # The command is of the form: # ssh -L <local_port>:<destination_host>:<destination_port> <gateway_host> # # We can't use aliases (mahuika, maui) or load-balancing hostnames # (login.mahuika.nesi.org.nz, login.maui.nesi.org.nz) because those run the risk # of connecting to the wrong host, e.g. connecting to mahuika02 when the TurboVNC # server is running on mahuika01. # # Also, the hostname of destination_host is as seen from gateway_host, # not from your local workstation. # # The choice of local port is yours, but you may find the following convention # useful: # # TurboVNC server on mahuika01 => local_port = destination_port + 10,000 # TurboVNC server on mahuika02 => local_port = destination_port + 20,000 # TurboVNC server on maui01 => local_port = destination_port + 30,000 # TurboVNC server on maui02 => local_port = destination_port + 40,000 # # Following this convention, for a connection via the SSH server on mahuika01, # such that the destination port is 22: # # local_port = 22 + 10000 = 10022 # ssh -L 10022:mahuika01.mahuika.nesi.org.nz:22 -N lander -
In a new terminal open an SSH tunnel from the already open tunnel to the desired TurboVNC port:
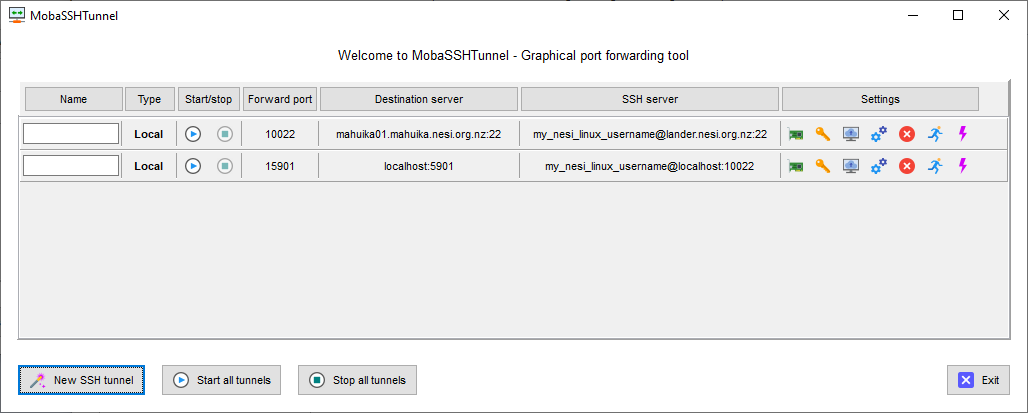
# This command sets up local SSH port forwarding.
# The command is of the form:
# ssh -L <local_port>:<destination_host>:<destination_port> <gateway_host>
#
# The hostname of destination_host is as seen from gateway_host,
# not from your local workstation. But with the above tunnel set up,
# anything done on (for example) port 10022 on localhost is seen as if
# it were done directly on mahuika01.
#
# The choice of local port is yours, but you may find the following convention
# useful:
#
# TurboVNC server on mahuika01 => local_port = destination_port + 10,000
# TurboVNC server on mahuika02 => local_port = destination_port + 20,000
# TurboVNC server on maui01 => local_port = destination_port + 30,000
# TurboVNC server on maui02 => local_port = destination_port + 40,000
#
# Following this convention, for a connection to a TurboVNC running on
# display 1 on mahuika01, such that the destination port is 5901:
#
# local_port = 5901 + 10000 = 15901
#
# The rationale for not using local ports 5901, 5902 etc., is that we
# want you to be able to run a VNC server on your own machine if you
# wish. Using the same (local) port as a TurboVNC server would want
# to use will potentially cause problems.
#
# Because the traffic is sent to port 10022 on localhost, which is
# forwarded to port 22 on mahuika01, the first "localhost" (between
# 15901 and 5901) is localhost as seen from mahuika01, i.e. it is
# mahuika01. The second localhost is your local workstation. But
# you have to use your NeSI Linux username, not your local Linux
# username, to authenticate. Clear as mud?
ssh -L 15901:localhost:5901 -N -p 10022 -l my_nesi_linux_username localhost
As an alternative to steps 1 and 2, if using MobaXTerm in Windows, set up and then start port forwarding connections to look like this:
- The tunnel through the lander node must be started before the tunnel through localhost can be started.
- The destination server for the tunnel through the lander node must be the NeSI login node where your TurboVNC server is running.
- The destination port for the second tunnel must be the port
corresponding to your display number:
5901for display 1,5902for display 2, and so forth.
-
Open the VNC viewer:
- From the Ubuntu command line:
vncviewer localhost::<local_port>(e.g.vncviewer localhost::15901) - On Windows: Select TurboVNC Viewer from the Start menu (or use
an equivalent option), and enter
localhost::<local_port>(e.g.vncviewer localhost::15901) at the dialog
- From the Ubuntu command line:
-
If prompted for a password, click the button to enter an empty password
Putting your TurboVNC client in fullscreen mode
Ctrl + Alt + Shift + F
Stopping the client
Make sure you have closed your VNC Viewer session before stopping either SSH tunnel.
Make sure the second SSH tunnel (the one to "localhost") is stopped before you close the first tunnel.
Stopping the server
-
Go to your tmux session on the server, or (alternatively) go to or open some other session on that server. If you use a different session, you will have to load the TurboVNC module if it's not already loaded.
-
Remind yourself of your TurboVNC display number.
-
Run the following command:
# Example: vncserver -kill :1
vncserver -kill :<display_number>
Finding open TurboVNC servers
If you've opened several TurboVNC servers, you may have lost track of some of them. The following command will help you find your TurboVNC server processes running on the current computer:
ps -f -u $(whoami) | grep Xvnc
This command will return results that look like the following:
my_username   55402      1  0 Feb04 ?        00:00:00 /opt/nesi/mahuika/TurboVNC/2.2.3-GCC-7.4.0/bin/Xvnc :2 -desktop TurboVNC: mahuika01:2 (my_username) -auth /home/my_username/.Xauthority -geometry 1240x900 -depth 24 -rfbwait 120000 -securitytypes none -rfbport 5902 -fp catalogue:/etc/X11/fontpath.d -deferupdate 1 -dridir /usr/lib64/dri -registrydir /usr/lib64/xorg
my_username  143972  77594  0 21:34 pts/18   00:00:00 grep --binary-files=without-match --color=auto Xvnc
The colon-number combination between the executable path (i.e.
/opt/nesi/mahuika/TurboVNC/2.2.3-GCC-7.4.0/bin/Xvnc in the above
example) and -desktop shows the display number. In this case the
display number is 2.
If you have several Xvnc processes open on that host, you can kill those
you don't want to keep by means of the kill command, or alternatively
by using the vncserver command described above.