Data Transfer using Globus
Globus
Globus is a third-party service for transferring large amounts of data between Globus Data Transfer Nodes (DTNs).
While NeSI supports use of other data transfer tools and protocols such
as scp, Globus provides the most comprehensive, efficient, and easy to
use service for NeSI users who need to move large data sets (more than a
few gigabytes at a time).
Using Globus, you can transfer data between the NeSI HPC platform and a Globus endpoint created on your personal workstation or at your institution. With Globus, high data transfer rates are achievable.
To use Globus to transfer data to/from NeSI platforms, you need:
- A Globus account (see Initial Globus Sign-Up and Globus ID)
- An active NeSI account (see Creating a NeSI Account)
-
Access privileges to the Globus endpoint/collection you plan on transferring data from or to. This endpoint/collection could be a personal one on your workstation, or it could be managed by your institution or a third party.
- Note: A NeSI user account does not create a Globus account, and similarly a Globus account does not create a NeSI user account. Nor can you, as the end user, link the two through any website.
Both your accounts (NeSI and Globus) must exist before you try to use the NeSI DTN.
Types of Globus endpoints or Data Transfer Nodes
Globus data transfers take place between endpoints. An endpoint is nothing more than an operating system (Windows, Linux, etc) that has the Globus endpoint software installed on it.
Endpoints come in two kinds: - personal - server
Within an endpoint users can access data via collections, with specific permissions settings for sharing with others.
The NeSI Data Transfer Node
The Data Transfer Node (DTN) for the NeSI platforms is called 'NeSI HPC Storage'. This endpoint acts as an interface between our HPC facility storage and a worldwide network of Globus endpoints.
The NeSI HPC Storage endpoint is an example of a server endpoint. These types of endpoints are usually configured to access large capacity and high-performance parallel filesystems. Endpoints can be unmanaged or managed by a subscription. NeSI DTN is a server type, managed endpoint (by NeSI subscription) which allows authorised users to provide data transfer and data sharing services on behalf of their Globus accounts.
Your institution may have its own managed server endpoint, and if so we encourage you to use that endpoint for your data transfers between your institution and NeSI. You may need to apply to the person or group administering the managed server endpoint, most likely your IT team, to get access to the endpoint. Your institution may even have several endpoints, in which case we recommend that you consider which one would be best suited for your data transfer requirements. If you need any help, Contact our Support Team or consult your institution's IT team.
If your institution doesn't have a managed server endpoint, you can set up a personal endpoint using software provided by Globus (see below). Please be aware that even if you set up a personal endpoint, you may still need to consult your IT team in order to make it usable, especially if your institution has an aggressive firewall.
Transferring data using a managed endpoint
As an example, to move files between the NeSI HPC Storage endpoint and the Otago University high-capacity central file storage (another managed server endpoint):
Info
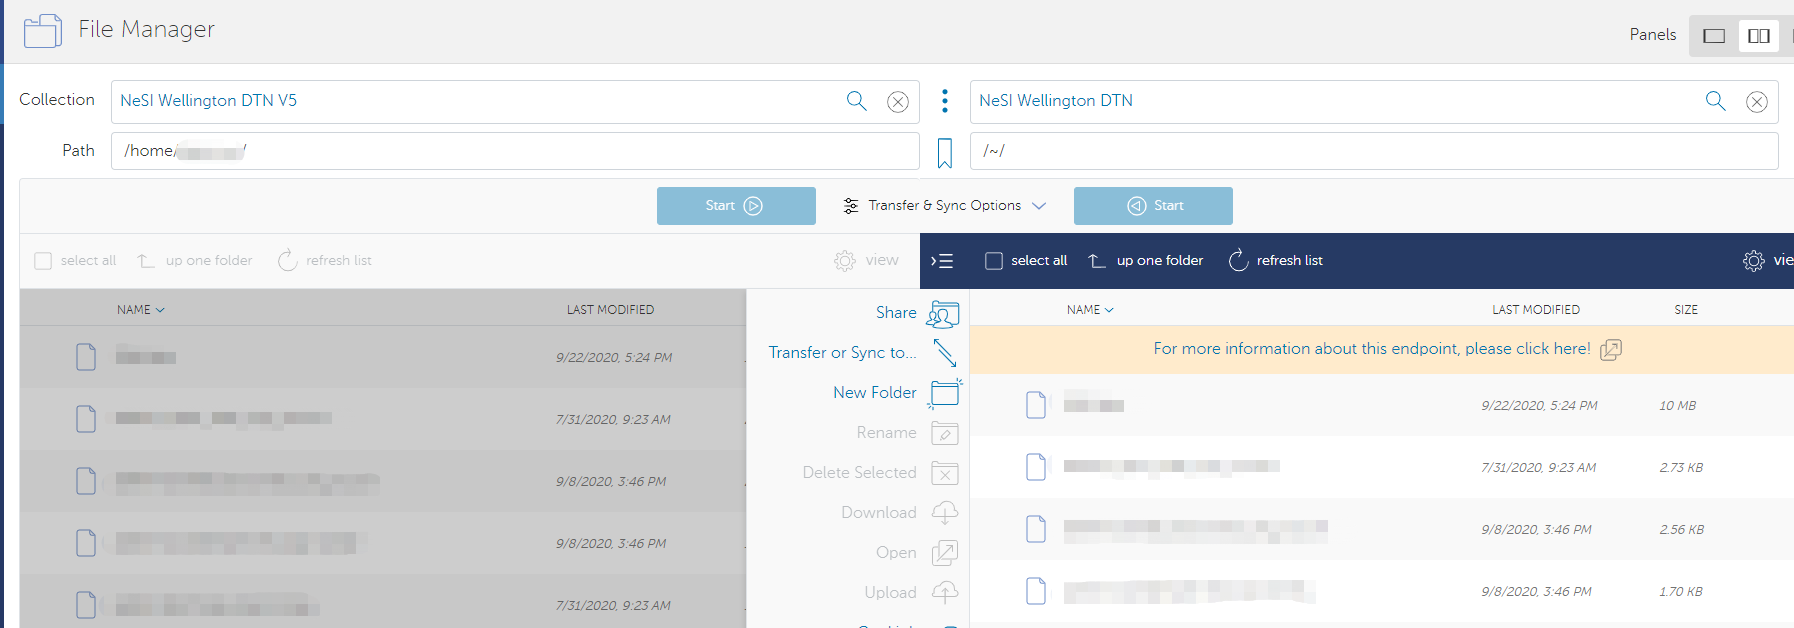
Log in to the NeSI File Manager where you are able to search for DTNs in the Collection field. Listing of available endpoints on the New Zealand Data Transfer Platform
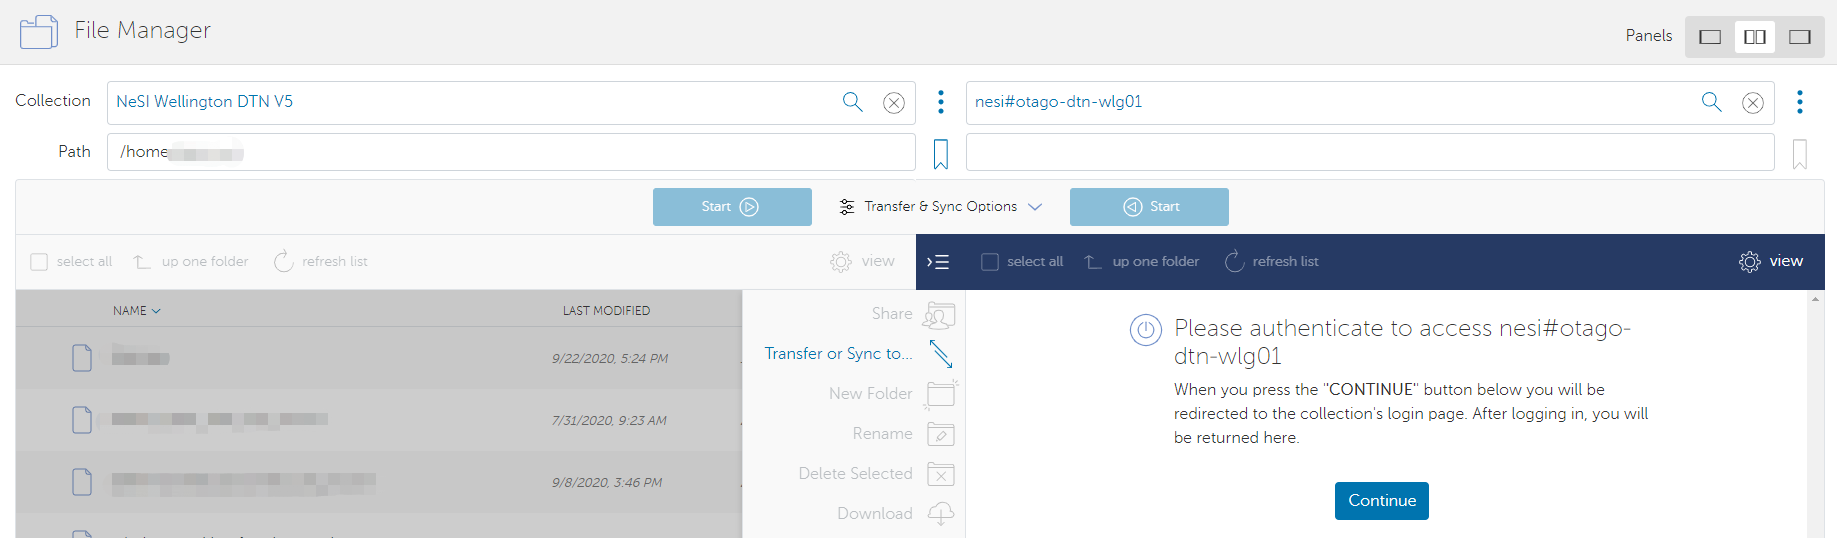
Find the NeSI endpoint by typing in "NeSI HPC Storage". Select the endpoint "NeSI HPC Storage" from the list, and you will be asked to authenticate your access to the endpoint.
Click Continue to the next step.
You'll be asked to select an identity to continue. Choose <username>@iam.nesi.org.nz.
- Note: OpenID Connect (OIDC) in Globus is used to enable secure authentication and authorization for accessing resources within the Globus ecosystem, particularly on Globus Connect Server endpoints. If this is your first login, you may be asked to bind your primary identity to the OICD login, and you will need to allow that.
The NeSI HPC Storage endpoint is protected by Tuakiri authentication.
After the login, you will navigate to the default root (display as "/") path, then you could change the path to
(1) your /home/<username> directory,
(2) project directory (read-only) /nesi/project/<project_code>
(3) project sub-directories of /nesi/nobackup/<project_code> - see Globus Paths,Permissions, Storage Allocation.
Navigate to your selected directory. e.g. the nobackup filesystem
/nesi/nobackup/<project_code> and select the two-endpoint panel
for transfer.
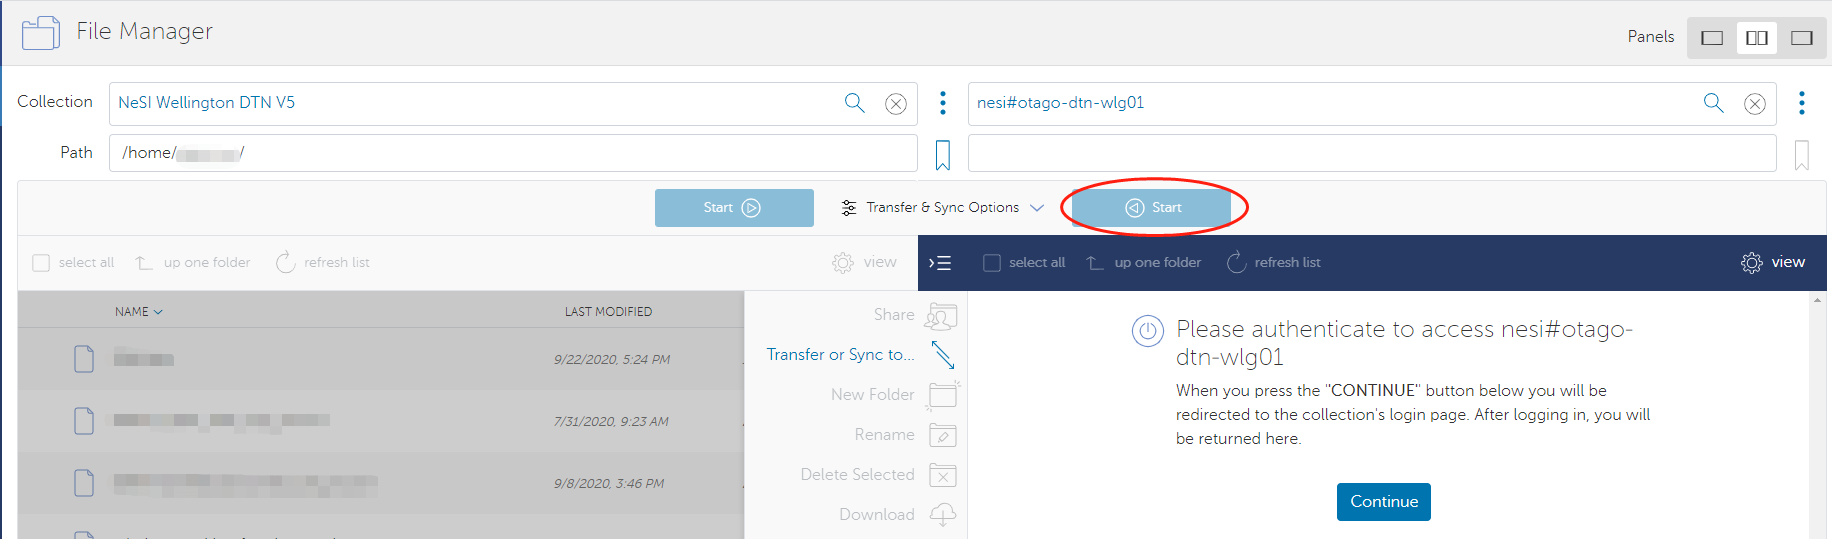
Select the target endpoint and authenticate.
When you have activated endpoints in both transfer windows, you can start transferring files between them.
Select files you wish to transfer and select the corresponding "Start" button:
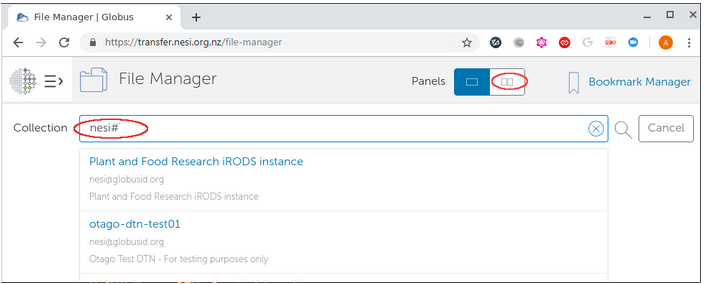
To find other NeSI endpoints, type in "nesi#":
In brief
- Sign in to the NeSI Globus Web App https://transfer.nesi.org.nz/. You will be taken to the File Manager page https://transfer.nesi.org.nz/file-manager
- If this is your first time, you will need to create a Globus account.
- Open the two-endpoint panel
 located
on the top-right of the File Manager page.
located
on the top-right of the File Manager page. - Select the Endpoints you wish to move files between (start typing "nesi#" to see the list of NeSI endpoints to select from). Authenticate at both endpoints.
- At Globus.org the endpoint defaults to
/home/<username>path (represented by~) on the NeSI platform. We do not recommend uploading data to your home directory, as home directories are very small. Instead, navigate to an appropriate project directory under /nobackup (see Globus Paths, Permissions, Storage Allocation). - Transfer the files by clicking the appropriate
 button
depending on the direction of the transfer.
button
depending on the direction of the transfer. - Check your email for confirmation about the job completion report.
Transferring data using a personal endpoint
To transfer files to/from your laptop, desktop computer or any other system you control, configure it as a Globus Personal Endpoint (see Personal Globus Endpoint Configuration for transfers between personal endpoints).
File sharing
To share files with others outside your filesystem, see https://docs.globus.org/how-to/share-files/.
Using Globus to transfer data to or from the cloud
Globus connectors enable a uniform interface for accessing, moving, and sharing across a variety of cloud providers. We do not currently have a connector subscription (note a subscription is required per cloud provider) so we can’t use globus to transfer to/from cloud storage. If you see this as key for you, please Contact our Support Team.
Our current advice for moving data to or from the cloud is to use tools such as Rclone (https://rclone.org/) or the cloud CLI's such as aswcli for S3 https://aws.amazon.com/cli/ or gcloud CLI (https://cloud.google.com/sdk/gcloud). If you have any trouble or would like further advice, please Contact our Support Team.