Containers as Kernels in JupyterLab
Apptainer containers can be run as kernels in JupyterLab, so that the code in your notebook executes inside the container.
Adding a container as a kernel to JupyterLab
There are two ways to run a container as a kernel; select the tab that suits you:
- Tool-Assisted Management: uses the
nesi-add-kernelcommand line tool to automate most of the setup. This is the recommended approach if possible. - Manual Management: you set up the kernel and its wrapper script by hand. This can be useful when you need more control over how the kernel is launched.
Warning
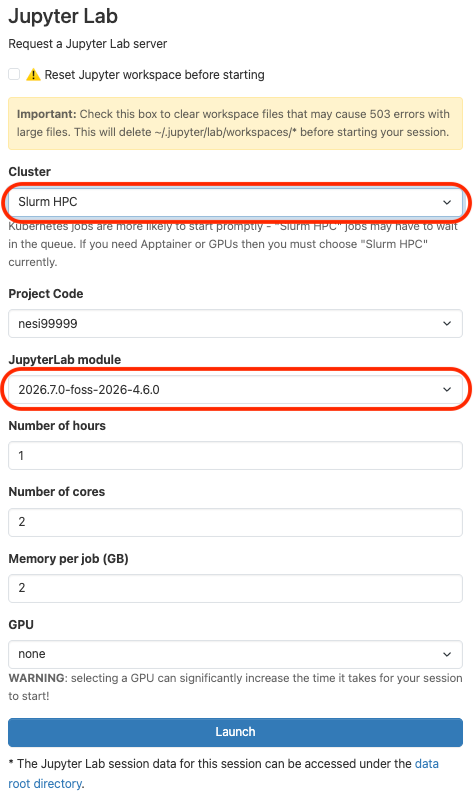
To use containers you must launch your Jupyter session with Cluster set to Slurm HPC and the JupyterLab module set to 2026.7.0-foss-2026-4.6.0. If you do not see Slurm HPC in the Cluster list, Contact our Support Team.
The nesi-add-kernel tool can register a container as a kernel for you.
This is the recommended way to run a container as a kernel.
First you need to open a terminal. It can be from a session on Jupyter via OnDemand or from a regular ssh connection on the Mahuika login node.
-
If you use the ssh option, make sure to load the JupyterLab module to have access to the
nesi-add-kerneltool:module purge # remove all previously loaded modules module load JupyterLab
There are two ways to run a container as a kernel; select the tab that suits your container:
This runs a Python kernel inside the container. The container must
provide a Python interpreter with the ipykernel package installed.
nesi-add-kernel <kernel_name> -cp <container_image.sif>
Where:
<kernel_name>: the name you want to give the kernel.<container_image.sif>: the path to your Apptainer container image.
This runs a bash kernel that dispatches every cell into the container.
nesi-add-kernel <kernel_name> -cb <container_image.sif>
Where:
<kernel_name>: the name you want to give the kernel.<container_image.sif>: the path to your Apptainer container image.
Passing arguments to Apptainer
Use the --container-args option to pass additional arguments through to
the apptainer exec command (this works for both -cp and -cb).
Because these arguments start with -, use the = form so they are not
mistaken for options to nesi-add-kernel itself. For example, to enable
GPU support:
nesi-add-kernel <kernel_name> -cp <container_image.sif> --container-args="--nv"
Multiple arguments can be passed together:
nesi-add-kernel <kernel_name> -cp <container_image.sif> \
    --container-args="--nv --pwd /opt/app"
Tip
For more information about nesi-add-kernel, type into the terminal:
nesi-add-kernel --help
You can also set up a container kernel by hand. You can build a kernel that uses a container's version of python or bash:
This runs a Python kernel inside the container (the manual
equivalent of the -cp option), so the container must provide a Python
interpreter with the ipykernel package installed.
First, change directory into the path where you would like to place your wrapper script.
- If you would like to share it with other members of your project, use
your project folder (
cd /nesi/project/<project-code>). - Avoid paths that include
00_nesi_projectsorhome, as these cause issues.
Second, create a file called wrapper.sh with the following contents
(replace <full_path_to_your_container> with the path to your container
image):
#!/usr/bin/env bash

# start with a clean environment
module purge

# isolate the container interpreter from your ~/.local site-packages
export APPTAINERENV_PYTHONNOUSERSITE=True

# bind the directory holding the Jupyter connection file (the last
# argument) so the in-container interpreter can read it
for connection_file in "$@"; do :; done
connection_dir="$(dirname "$connection_file")"

# run a python kernel inside the container
exec apptainer exec -B "$connection_dir" --nv <full_path_to_your_container> python "$@"
Make the wrapper script executable:
chmod +x wrapper.sh
Third, create a directory for your kernel:
mkdir -p ~/.local/share/jupyter/kernels/my-container
cd ~/.local/share/jupyter/kernels/my-container
and create a file called kernel.json. The file should look like this:
{
    "argv": [
        "<path_to_wrapper.sh>/wrapper.sh",
        "-m",
        "ipykernel_launcher",
        "-f",
        "{connection_file}"
    ],
    "display_name": "Container Name",
    "language": "python"
}
- Change
display_nameto what you would like to call your kernel by.
After refreshing JupyterLab your new kernel should show up in the
Launcher under the display name you set in kernel.json (Container
Name in the example above).
This runs a bash kernel on the host that dispatches every cell into
the container (the manual equivalent of the -cb option). To do this you
first need to set up a Python virtual environment, in the same way as the
Manual Management approach described on the
Python and R kernels in JupyterLab
page.
In brief, the steps below create a Python virtual environment, install
bash_kernel into it, write a wrapper script that points bash_kernel at
your container, and then register that wrapper as a Jupyter kernel.
First, change directory into the path where you would like to place your virtual environment.
- If you would like to share it with other members of your project, use
your project folder (
cd /nesi/project/<project-code>). - Avoid paths that include
00_nesi_projectsorhome, as these cause issues.
Second, in a terminal run the following commands to load a Python environment module:
module purge
module load Python/3.14.4-foss-2026
Now create a Python virtual environment named my-container-venv. You can
change the name of the environment and install other Python packages as
required.
python3 -m venv ./my-container-venv
source ./my-container-venv/bin/activate
pip install --upgrade pip
Third, install bash_kernel in your virtual environment.
What is bash_kernel?
bash_kernel runs a bash shell as a Jupyter kernel. Here we point that bash shell at your container, so every cell you run in JupyterLab executes inside the container. It feels like a normal JupyterLab session, but the commands run in your container rather than on the host.
pip install git+https://github.com/geoffreyweal/bash_kernel
Fourth, create a wrapper for your virtual environment. Change directory
into your my-container-venv folder:
cd my-container-venv
And add the following as wrapper.sh into your my-container-venv folder:
#!/usr/bin/env bash

# load required modules here
module purge
module load Python/3.14.4-foss-2026

# activate the virtual environment that has bash_kernel installed
source <full_path_to_your_venv>/my-container-venv/bin/activate

# run the kernel on the host (it dispatches every command into the container)
exec python3 "$@"
Make the wrapper script executable:
chmod +x wrapper.sh
Fifth, create a directory for your kernel:
mkdir -p ~/.local/share/jupyter/kernels/bash
cd ~/.local/share/jupyter/kernels/bash
and create a file called kernel.json. The file should look like this:
{
    "argv": [
        "<path_to_wrapper.sh>/wrapper.sh",
        "-m",
        "bash_kernel",
        "-f",
        "{connection_file}"
    ],
    "display_name": "Container Name",
    "language": "bash",
    "env": {
        "BASH_KERNEL_CMD": "apptainer exec --nv <full_path_to_your_container> bash"
    }
}
- Change
display_nameto what you would like to call your kernel by. -
Update the
apptainer execline inBASH_KERNEL_CMDto match your own image, for example:"BASH_KERNEL_CMD": "apptainer exec --pwd /opt/PMDM --nv /nesi/project/<project-code>/containers/PMDM/pmdm_cu130.simg bash"
After refreshing JupyterLab your new kernel should show up in the Launcher
under the display name you set in kernel.json (Container Name in the
example above).
Listing your kernels
To list all the kernels that are currently installed, run:
module purge
module load JupyterLab
jupyter-kernelspec list
This works for any kernel, regardless of whether it was registered using the Tool-Assisted Management or Manual Management approach.
Sharing a kernel
You can also configure a shared container kernel that others with access to the
same project will be able to load. Whichever approach you use, make sure the
container image (and, for a bash kernel, the virtual environment and
wrapper.sh) live in a shared location such as your project folder
(/nesi/project/<project-code>) — other users cannot read your home directory.
How you share depends on whether you registered the kernel with the
tool-assisted or manual approach:
To share a container kernel, register it with nesi-add-kernel as you
normally would, but add the --shared flag. This installs the kernel into
your project's shared location, so other members of your project will see it
automatically. Select the tab for the kind of container kernel you are
sharing:
nesi-add-kernel --shared <kernel_name> -cp <container_image.sif>
Where <kernel_name> is the name you want to give to the kernel. Note
the --shared flag in the nesi-add-kernel command line.
nesi-add-kernel --shared <kernel_name> -cb <container_image.sif>
Where <kernel_name> is the name you want to give to the kernel. Note
the --shared flag in the nesi-add-kernel command line.
Note
Run nesi-add-kernel --shared from a terminal inside a Jupyter session
on OnDemand so it can detect your project. From a regular ssh session you
will also need to pass the project code with the --account option, for
example nesi-add-kernel --shared --account <project-code> ....
For a manually-created kernel, you first create the kernel yourself,
following the manual steps in the Manual Management tab earlier on this
page, but making sure the container image and wrapper.sh (and, for a bash
kernel, the virtual environment) are all in your shared project folder.
Next, your team members set up the kernel on their side by creating the kernelspec in their own home directory. The steps depend on the type of container kernel you created, so follow the matching tab:
Your team members create a directory for the kernel:
mkdir -p ~/.local/share/jupyter/kernels/my-container
cd ~/.local/share/jupyter/kernels/my-container
and create a file called kernel.json that points at the shared
wrapper.sh. The file should look like this:
{
    "argv": [
        "<path_to_shared_wrapper.sh>/wrapper.sh",
        "-m",
        "ipykernel_launcher",
        "-f",
        "{connection_file}"
    ],
    "display_name": "Container Name",
    "language": "python"
}
- Change
display_nameto what you would like to call your kernel by.
After refreshing JupyterLab the shared kernel should show up in the Launcher.
Your team members create a directory for the kernel:
mkdir -p ~/.local/share/jupyter/kernels/bash
cd ~/.local/share/jupyter/kernels/bash
and create a file called kernel.json that points at the shared
wrapper.sh. The file should look like this:
{
    "argv": [
        "<path_to_shared_wrapper.sh>/wrapper.sh",
        "-m",
        "bash_kernel",
        "-f",
        "{connection_file}"
    ],
    "display_name": "Container Name",
    "language": "bash",
    "env": {
        "BASH_KERNEL_CMD": "apptainer exec --nv <full_path_to_your_container> bash"
    }
}
- Change
display_nameto what you would like to call your kernel by.
After refreshing JupyterLab the shared kernel should show up in the Launcher.
Removing a kernel
Remove a user-specific kernel
To delete a user-specific kernel, run:
module purge
module load JupyterLab
jupyter-kernelspec list
jupyter-kernelspec remove <kernel_name>
where <kernel_name> is the name of the kernel to delete, as shown by
jupyter-kernelspec list.
Remove a shared kernel
If the kernel was shared with your project, it instead lives in the project folder. Delete the kernel's directory:
rm -r /nesi/project/<ACCOUNT_ID>/.jupyter/share/jupyter/kernels/<KERNEL_NAME>
where <ACCOUNT_ID> is your project's account code and <KERNEL_NAME> is the name of
the kernel to delete.