Slurm Composer
Introduction
Slurm Composer lets you write, submit and track Slurm batch jobs from your web browser — no terminal required. You fill in a simple form (project, partition, CPUs, memory, time limit, …) and it builds the matching #SBATCH job script for you, which you can review, edit and submit directly to the scheduler.
It is well suited to people who are new to the command line, and to anyone who wants to put together a job script quickly without remembering every Slurm option.
Prerequisite
Requires an account and membership of at least one project.
Opening Slurm Composer
- Log in to Mahuika OnDemand.
- From the top menu choose Jobs → Slurm Composer (or open the Slurm Composer tile).
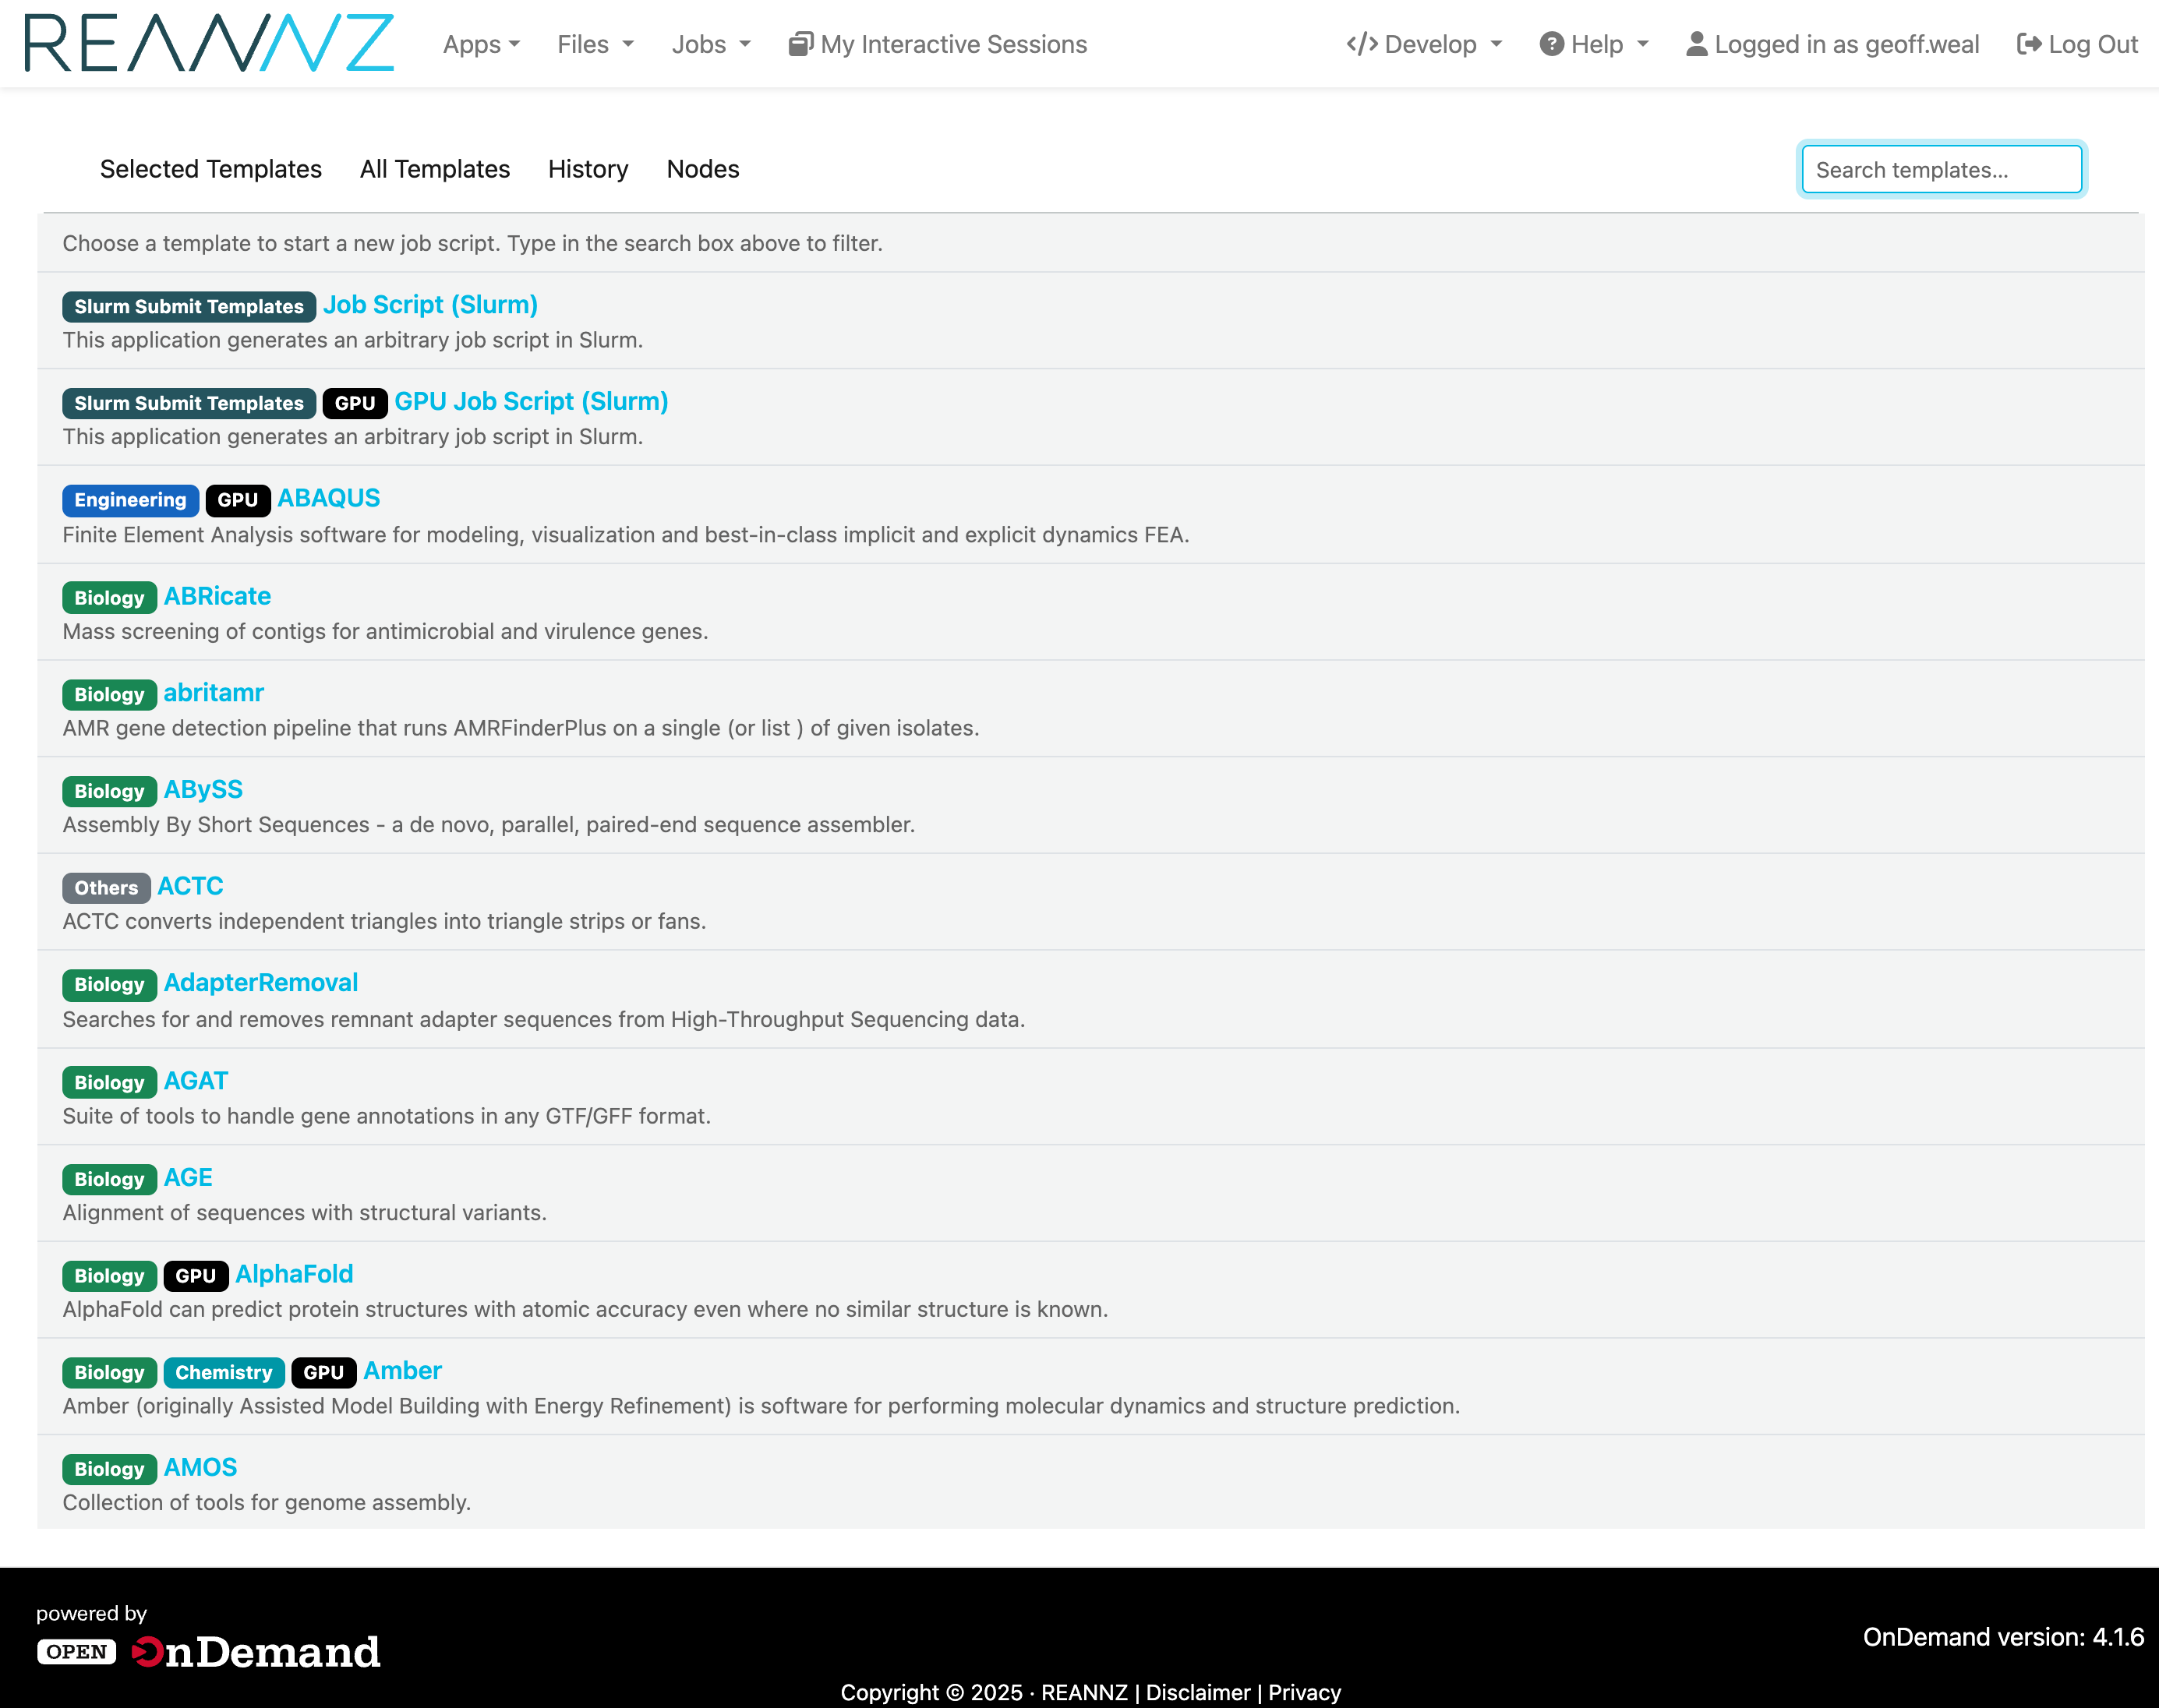
The home page is the Selected Templates page:
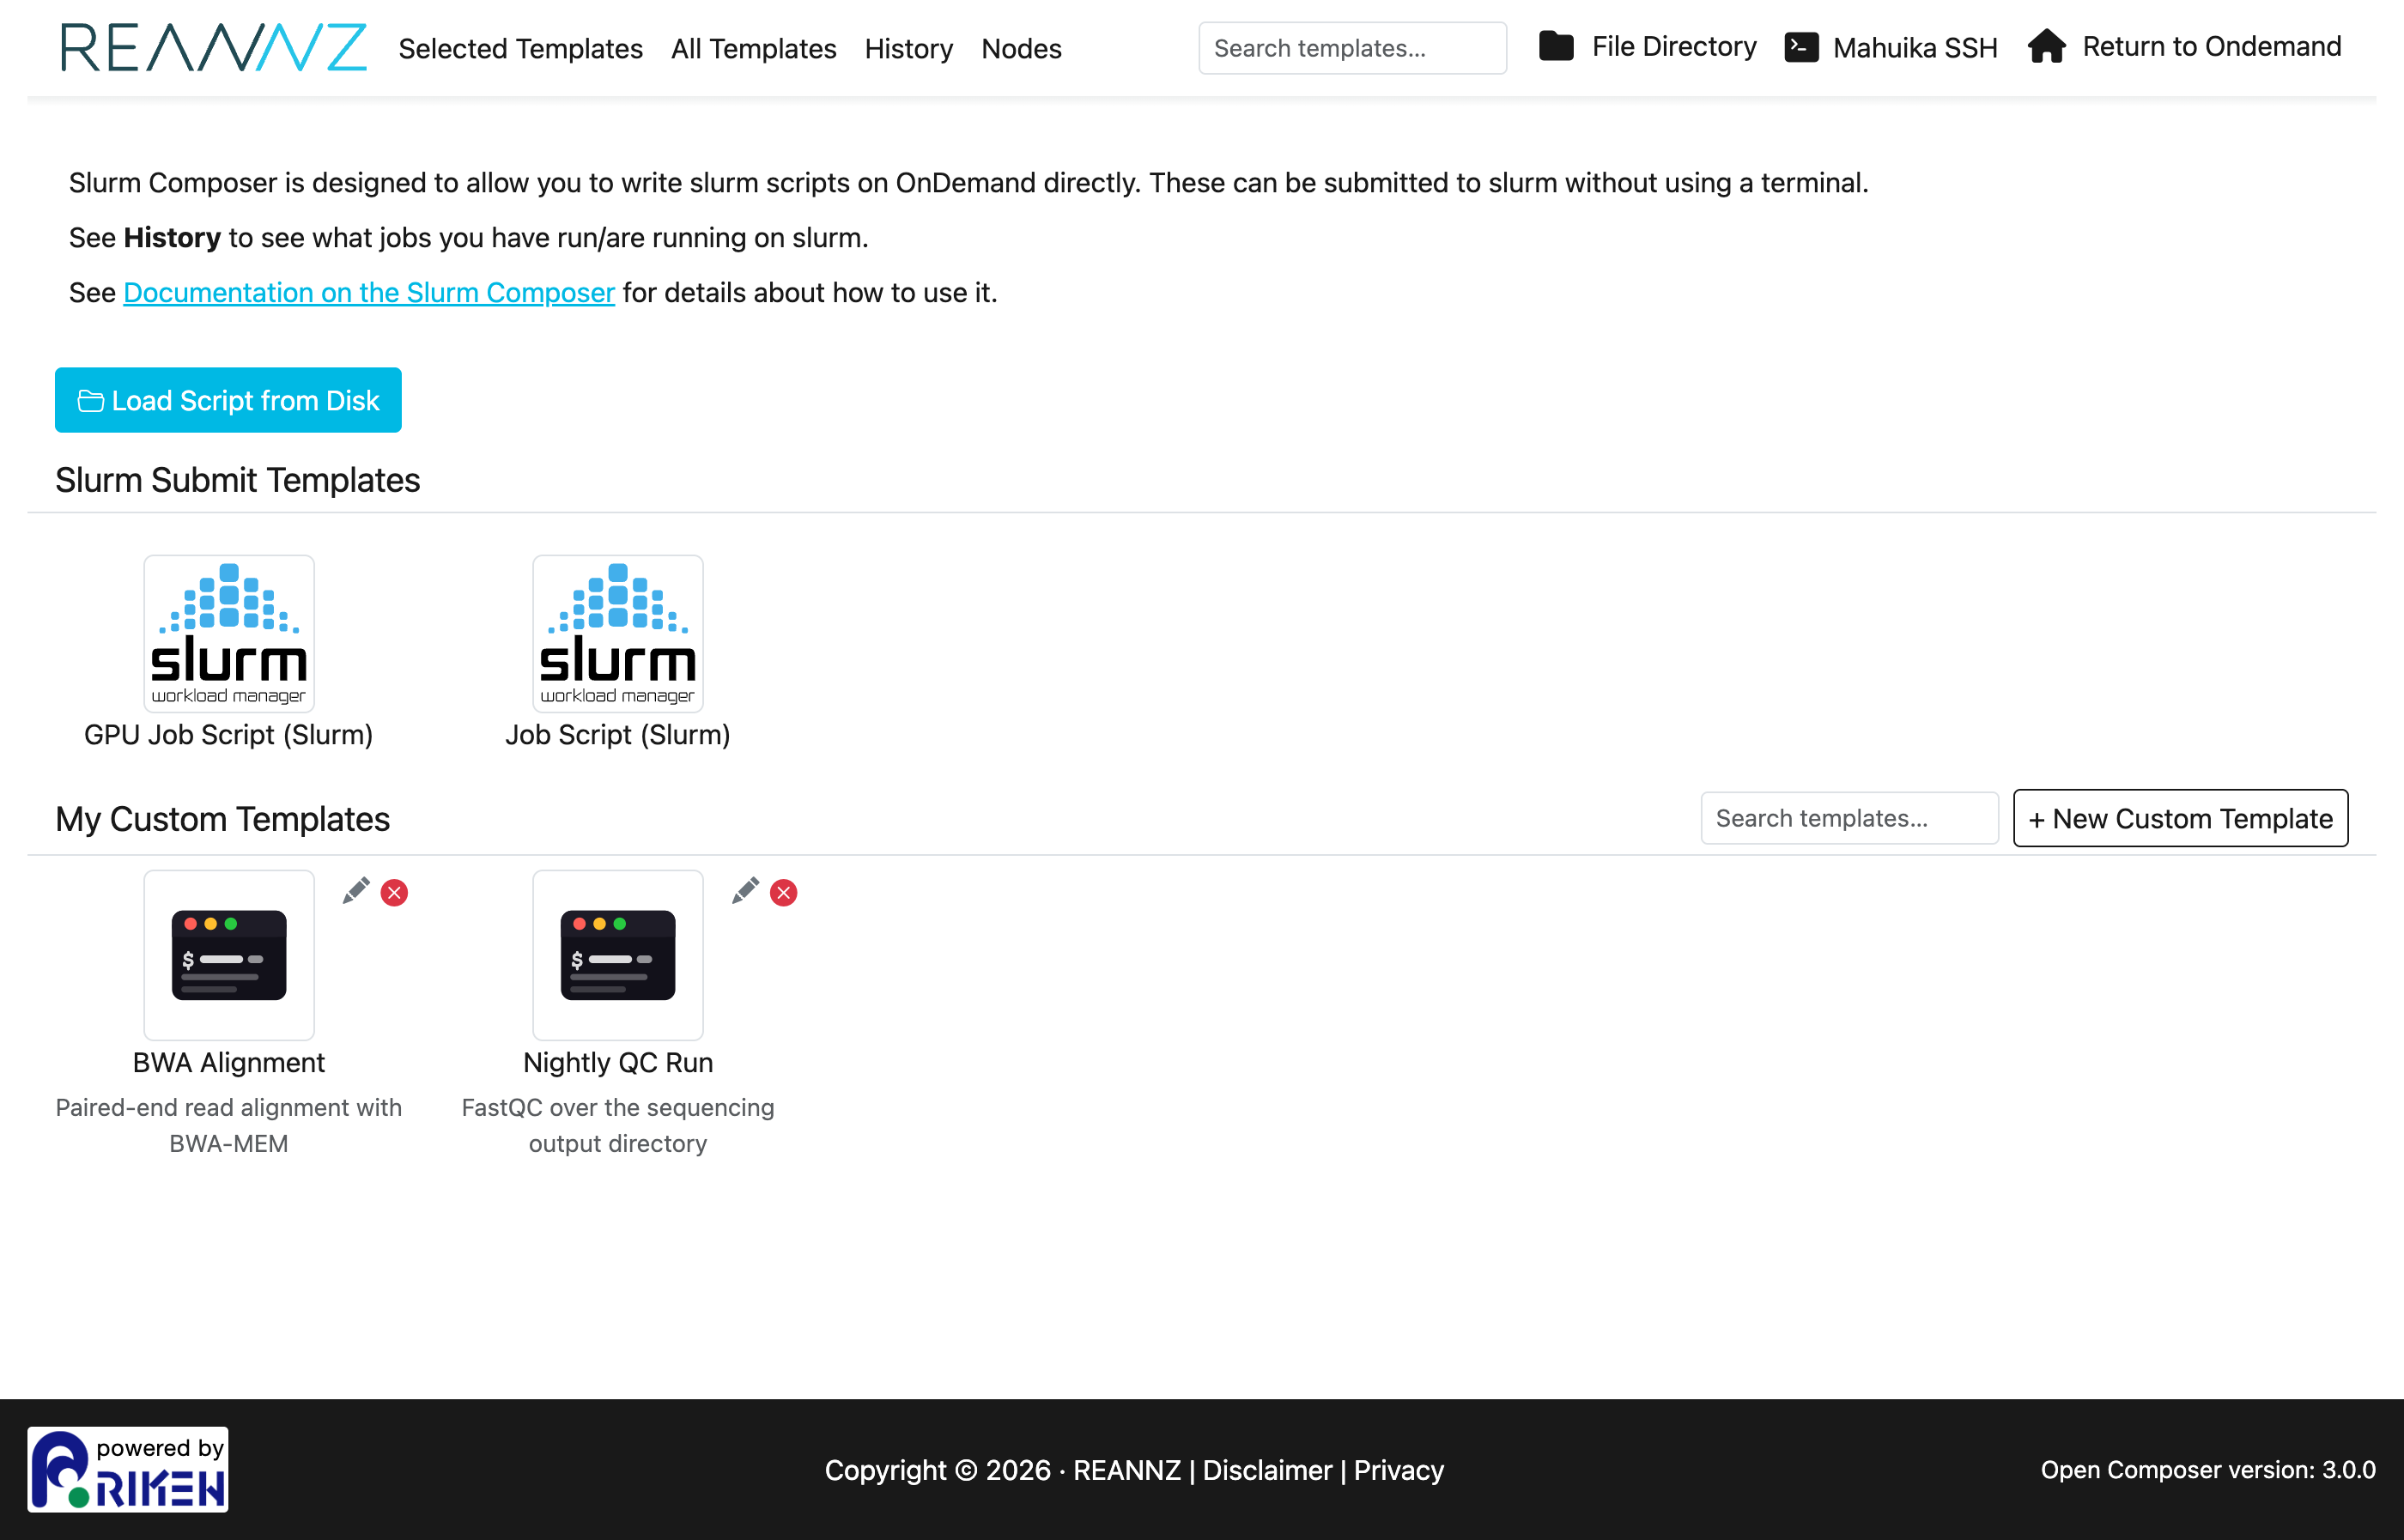
The page is organised into:
- Slurm Submit Templates — the two starting points: Job Script (Slurm) for a CPU job and GPU Job Script (Slurm) for a job that needs a GPU.
- My Custom Templates — job configurations you have saved yourself (see My Custom Templates below).
- The navigation bar with History, Nodes, the File Directory, Mahuika SSH (shell access) and Return to OnDemand.
Building a job script
Click Job Script (Slurm) to open the form. The form is on the left and the Script Content it generates is shown live on the right — every change you make to the form updates the script.
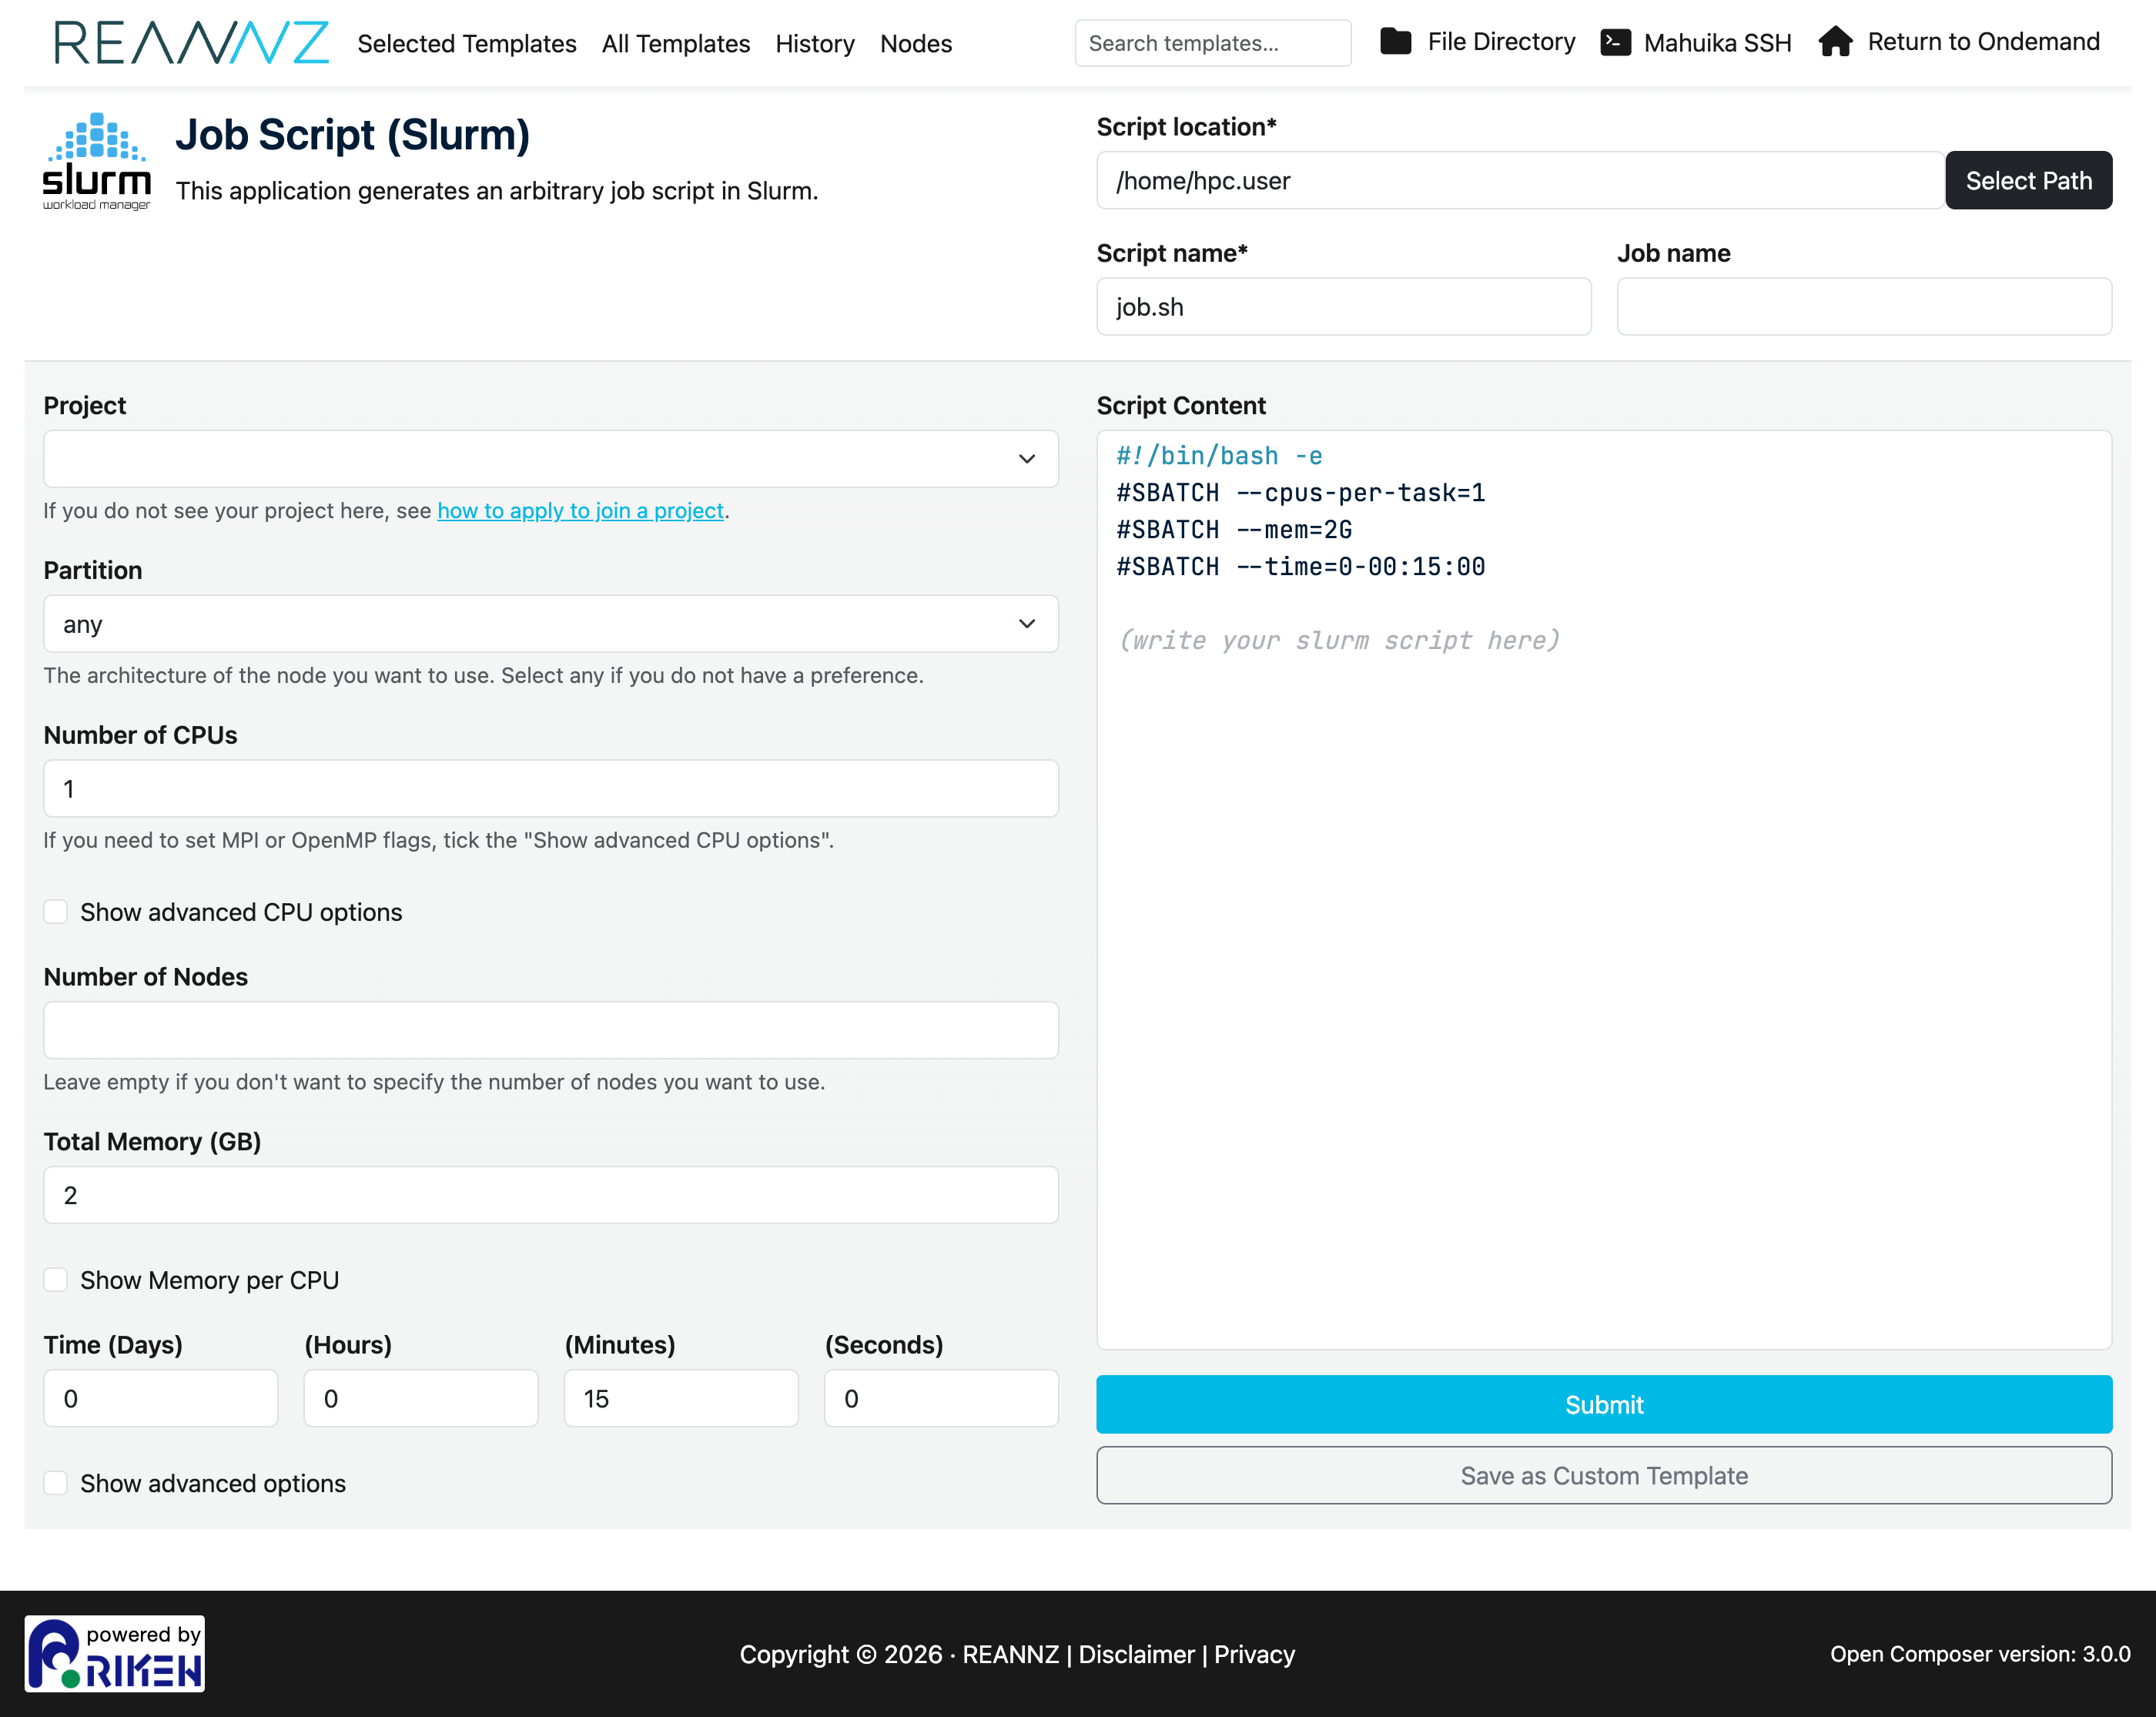
The main fields are:
| Field | What it sets | Slurm option |
|---|---|---|
| Project | The project code your usage is charged to. Only projects you belong to are listed. | --account |
| Partition | The type of node to run on. Choose any if you have no preference. Options are either genoa or milan. More information about the nodes that make up these partitions. |
--partition |
| Number of CPUs | How many CPU cores to request. | --cpus-per-task |
| Number of Nodes | How many nodes to spread the job over (leave blank for the default). | --nodes |
| Total Memory (GB) | Total RAM for the whole job. | --mem |
| Time (Days / Hours / Minutes / Seconds) | The wall-clock time limit. | --time |
Tip
Each field has a short explanation underneath it, and several link out to the relevant Mahuika documentation (for example how to apply to join a project, Parallel Computing and Using GPUs).
Advanced CPU options
By default Number of CPUs requests CPU cores for a single task (--cpus-per-task), which is what most jobs need. If you are running an MPI job or want to control tasks and threads separately, tick Show advanced CPU options. This replaces the single field with two:
- Number of MPI processes (
ntasks) — the number of separate tasks/processes (--ntasks). - Number of OpenMP threads (
cpus-per-task) — the cores given to each task (--cpus-per-task).
Advanced options
Tick Show advanced options to reveal extra settings:
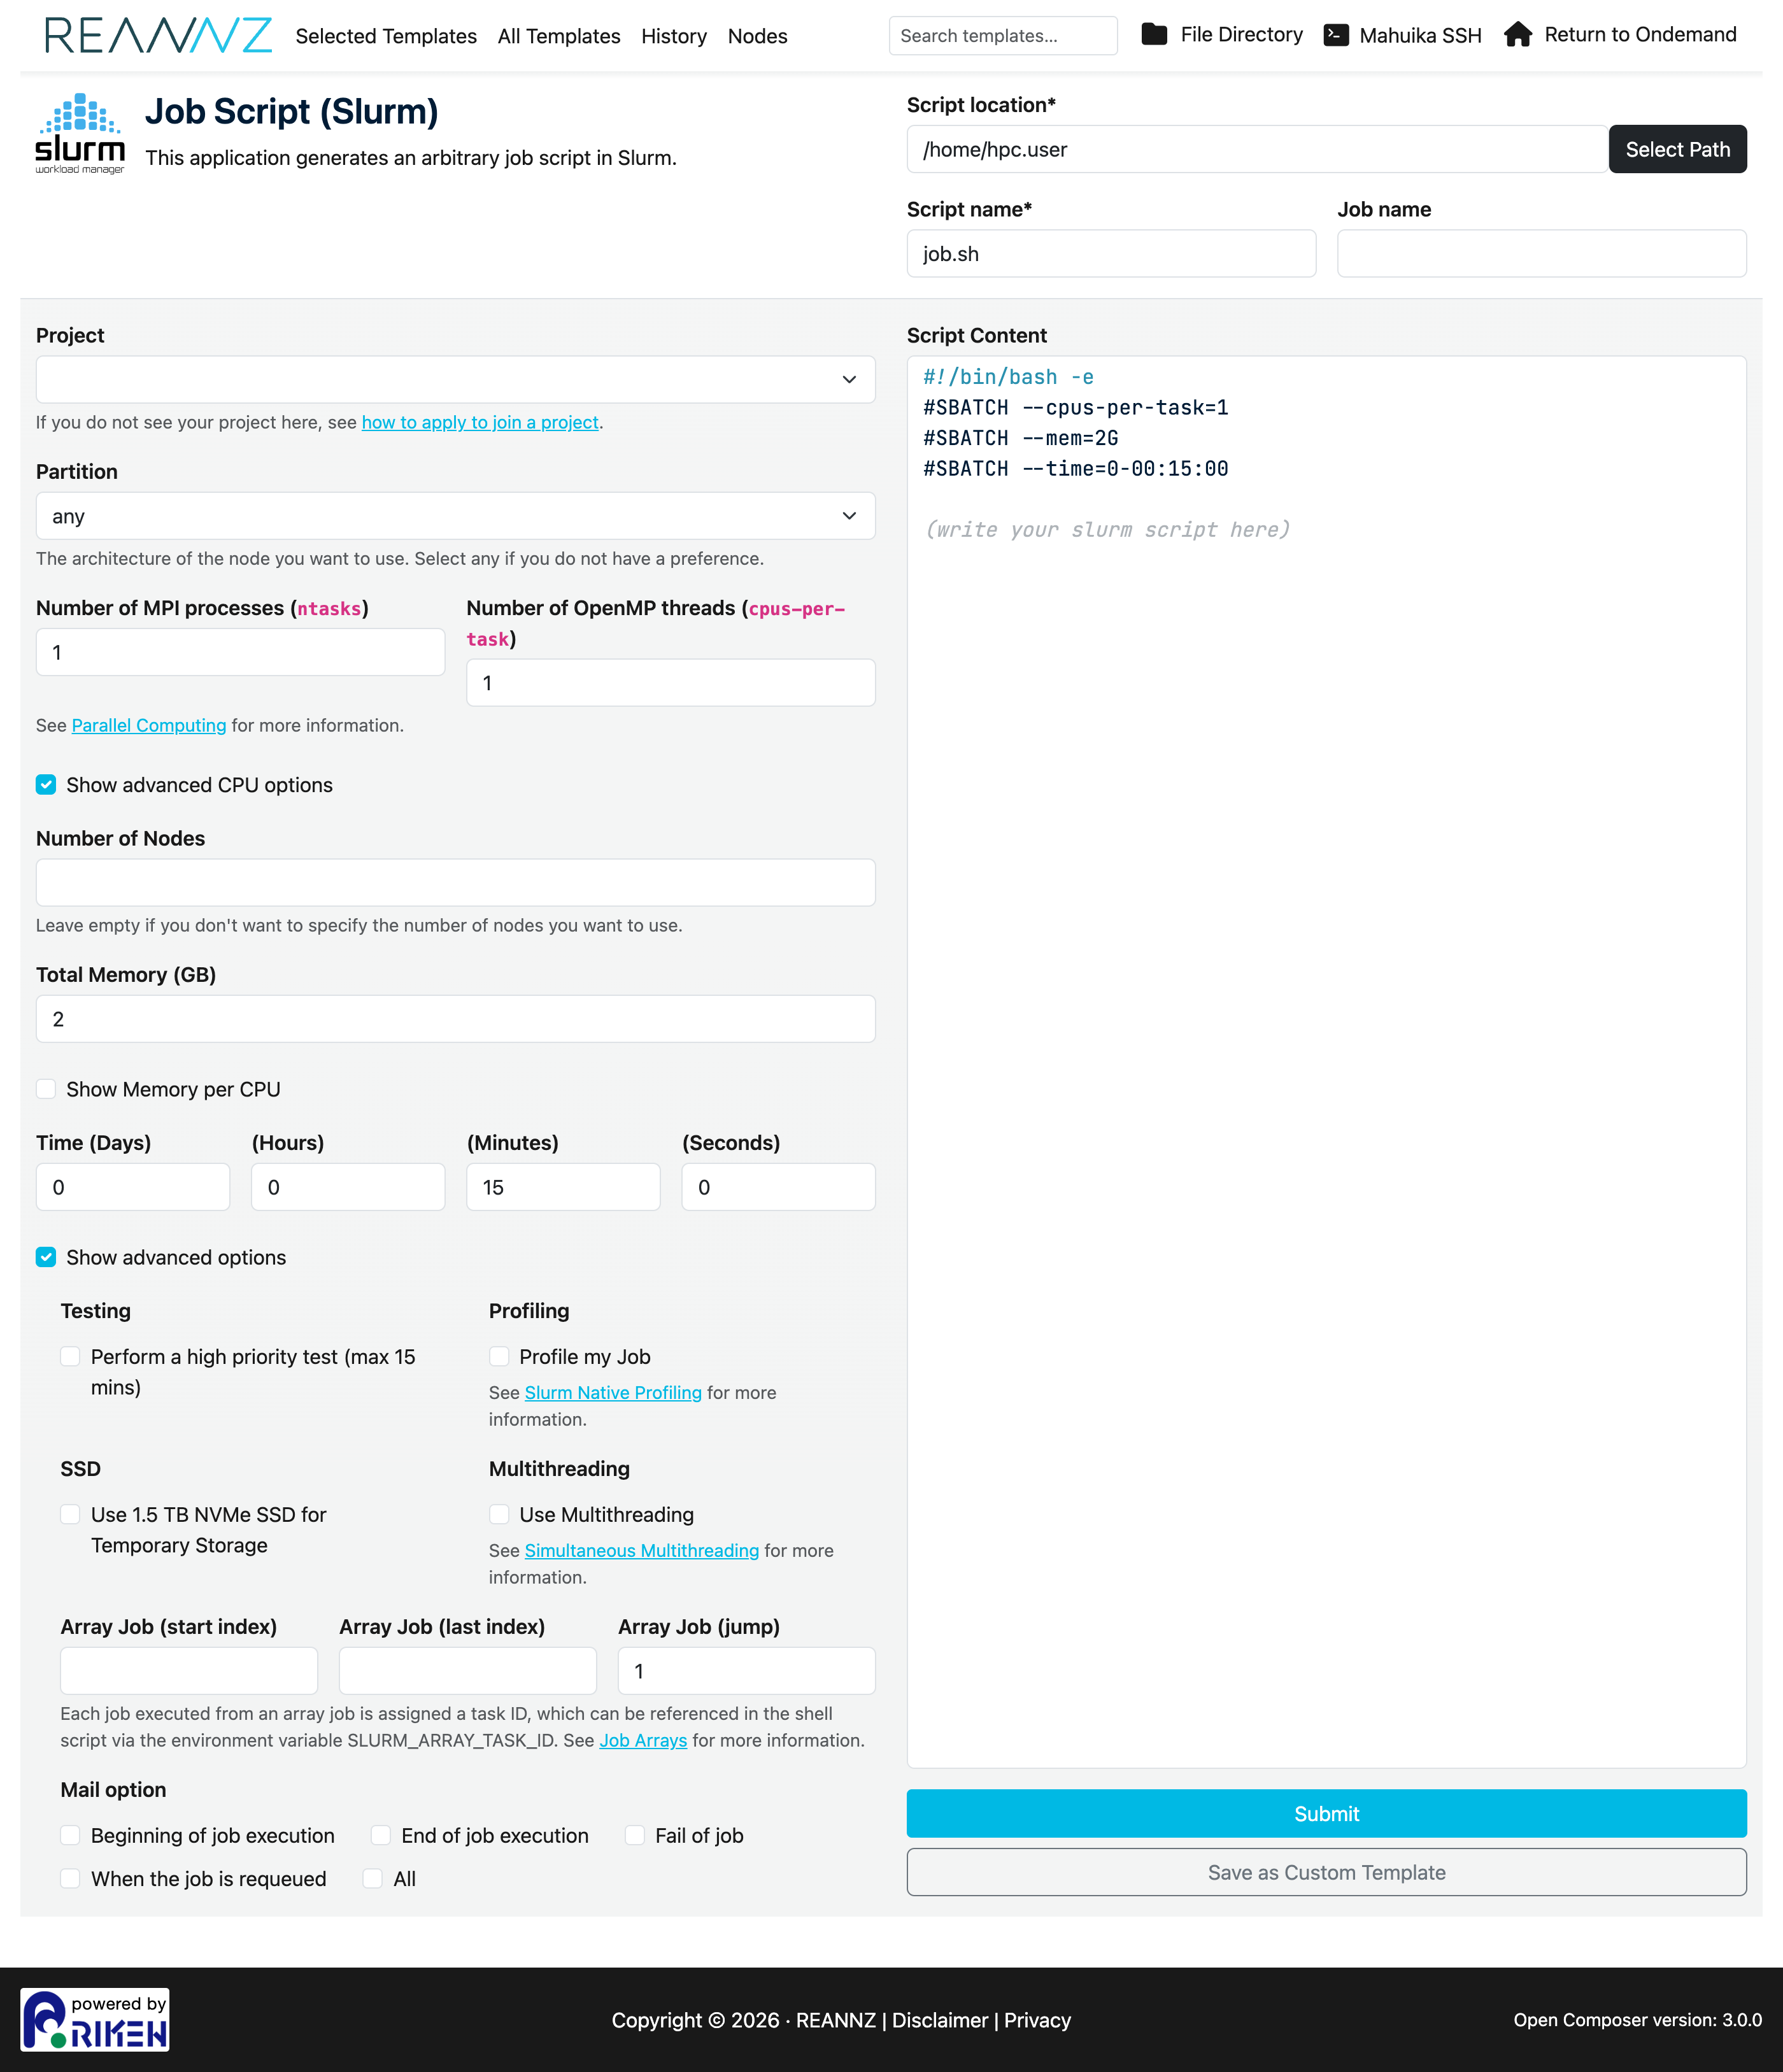
- Testing — submit as a short, high-priority test job (handy for checking a script runs before committing a long allocation).
- Profiling — record resource-usage information about the job (see Slurm Native Profiling).
- SSD — request a fast local NVMe SSD for temporary storage (
--gres=ssd). Point your job's temporary files at${TMPDIR}to use it. - Multithreading — enable simultaneous multithreading (
--threads-per-core=2); see Simultaneous Multithreading. - Array Job — run the same script many times as a job array, using a start index, last index and step.
- Mail option — email you when the job begins, ends, fails, and so on.
Editing the script directly
The Script Content box is editable. You can fine-tune the generated #SBATCH lines or add the commands your job should run (loading modules, calling your program, etc.) before submitting. Form-driven lines stay in sync as you change widgets, while lines you add by hand are preserved.
GPU jobs
Choose GPU Job Script (Slurm) for work that needs a GPU. It has the same fields as the CPU form plus a Type of GPU selector. Picking a GPU type automatically moves the job to a partition that provides it.
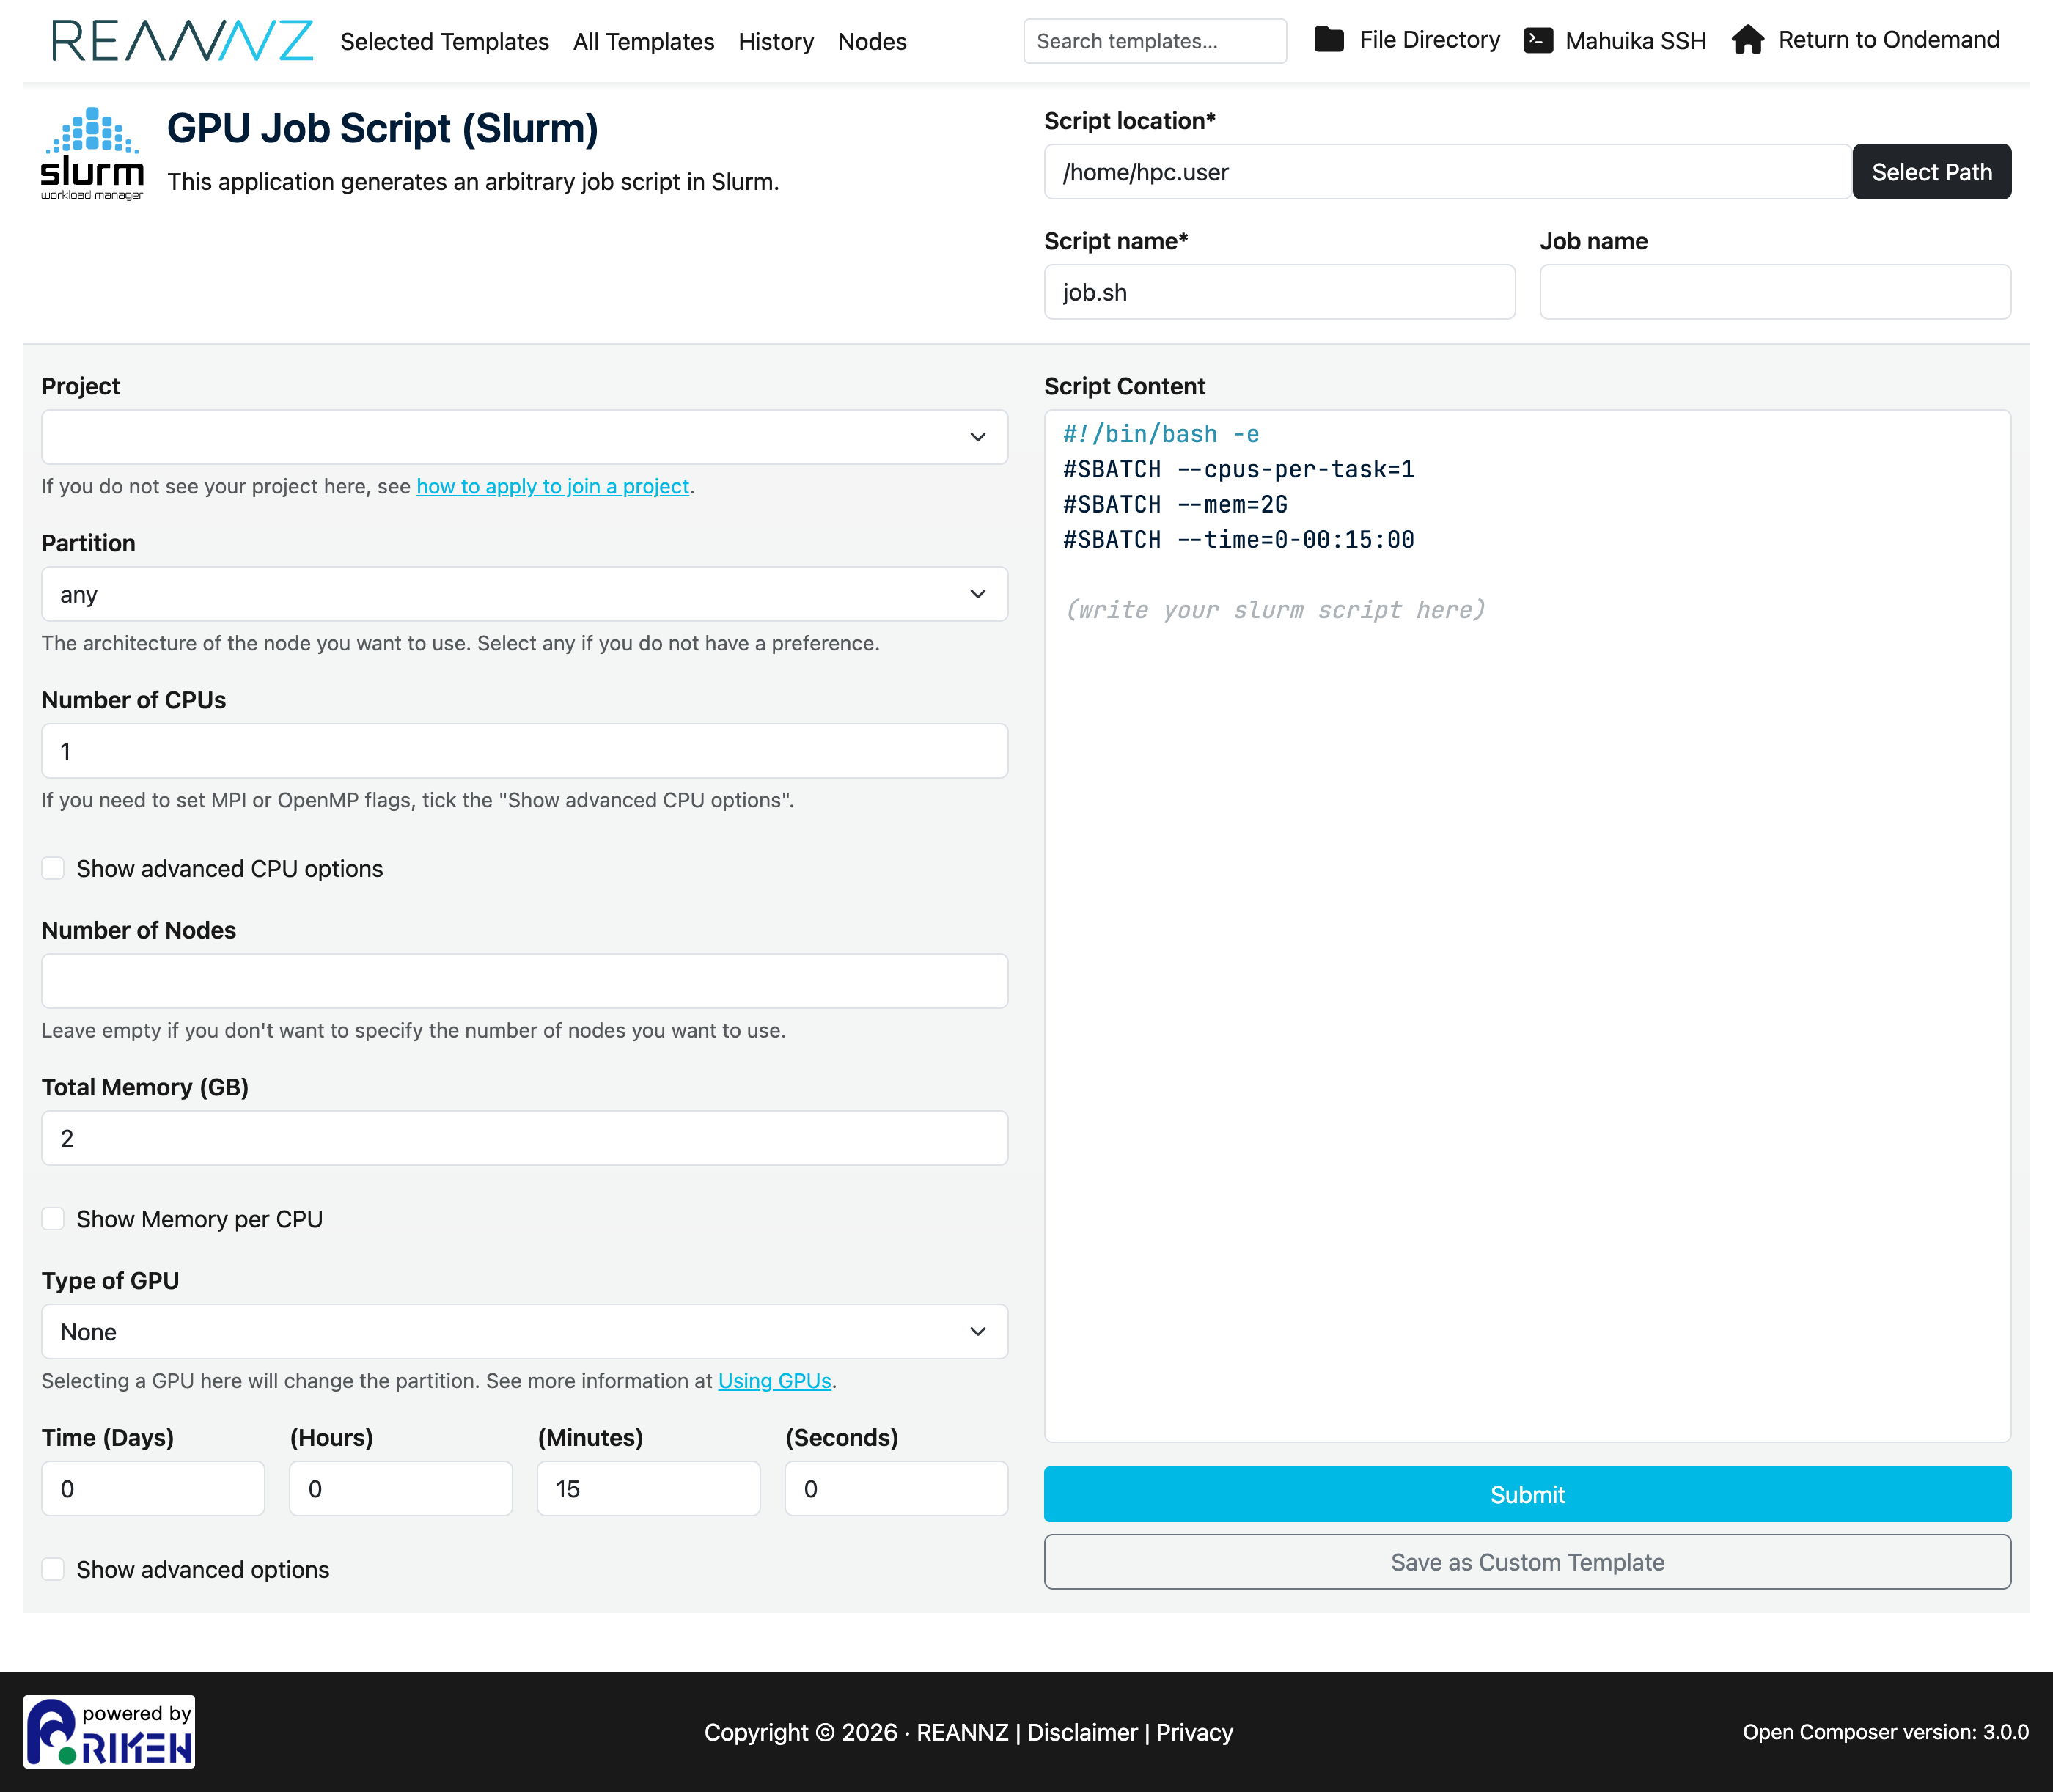
See Using GPUs for guidance on choosing GPU types and counts.
Submitting and finding your job
When you are happy with the script, click Submit. The script is written to the Script location shown at the top of the form (default: your home directory, as Script name e.g. job.sh) and submitted to Slurm. You can then track it on the History page.
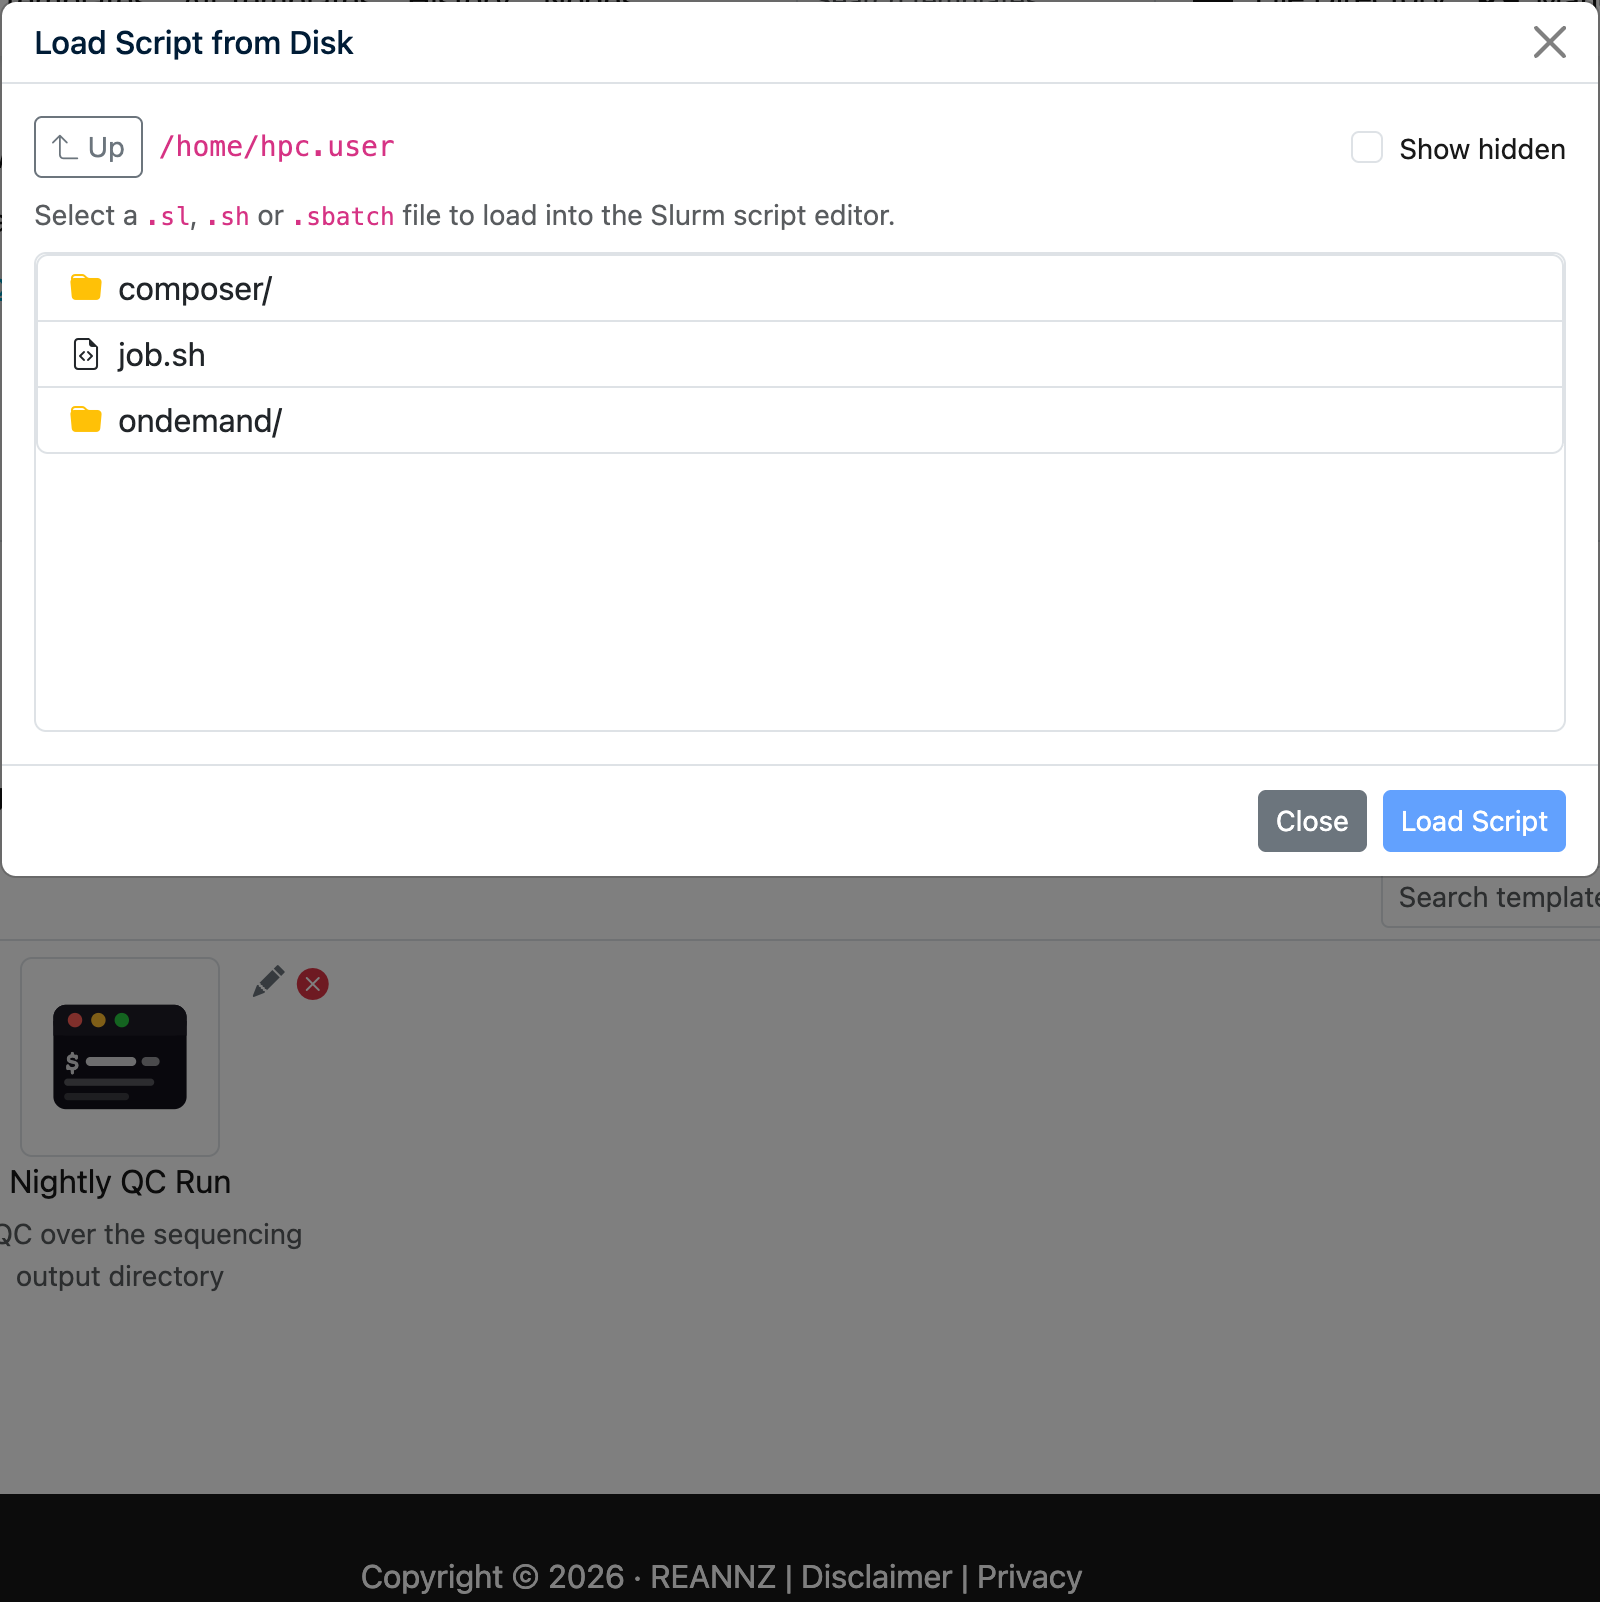
Loading or creating a script
Click Load or Create a Script from Disk (on the Selected Templates page, and on the New Custom Template page) to open a full-page browser of your files on the cluster.
It works much like the OnDemand Files app:
- Navigate by clicking folders, the Home and Up buttons, or by typing a path straight into the path box. Refresh re-reads the current folder, and your browser's Back/Forward buttons step through the folders you have visited.
- Sort by clicking the Name, Size or Modified headings; Filter the list by typing in the filter box; and tick Show hidden to include dot-files or Owner & mode to show each entry's owner and permissions.
Load an existing script
Click a .sl, .sh, .sbatch, .batch or .slurm file to open it in the Slurm script editor, where you can review, edit and submit it — or save it as a custom template. Files that are not scripts are shown greyed-out and cannot be selected.
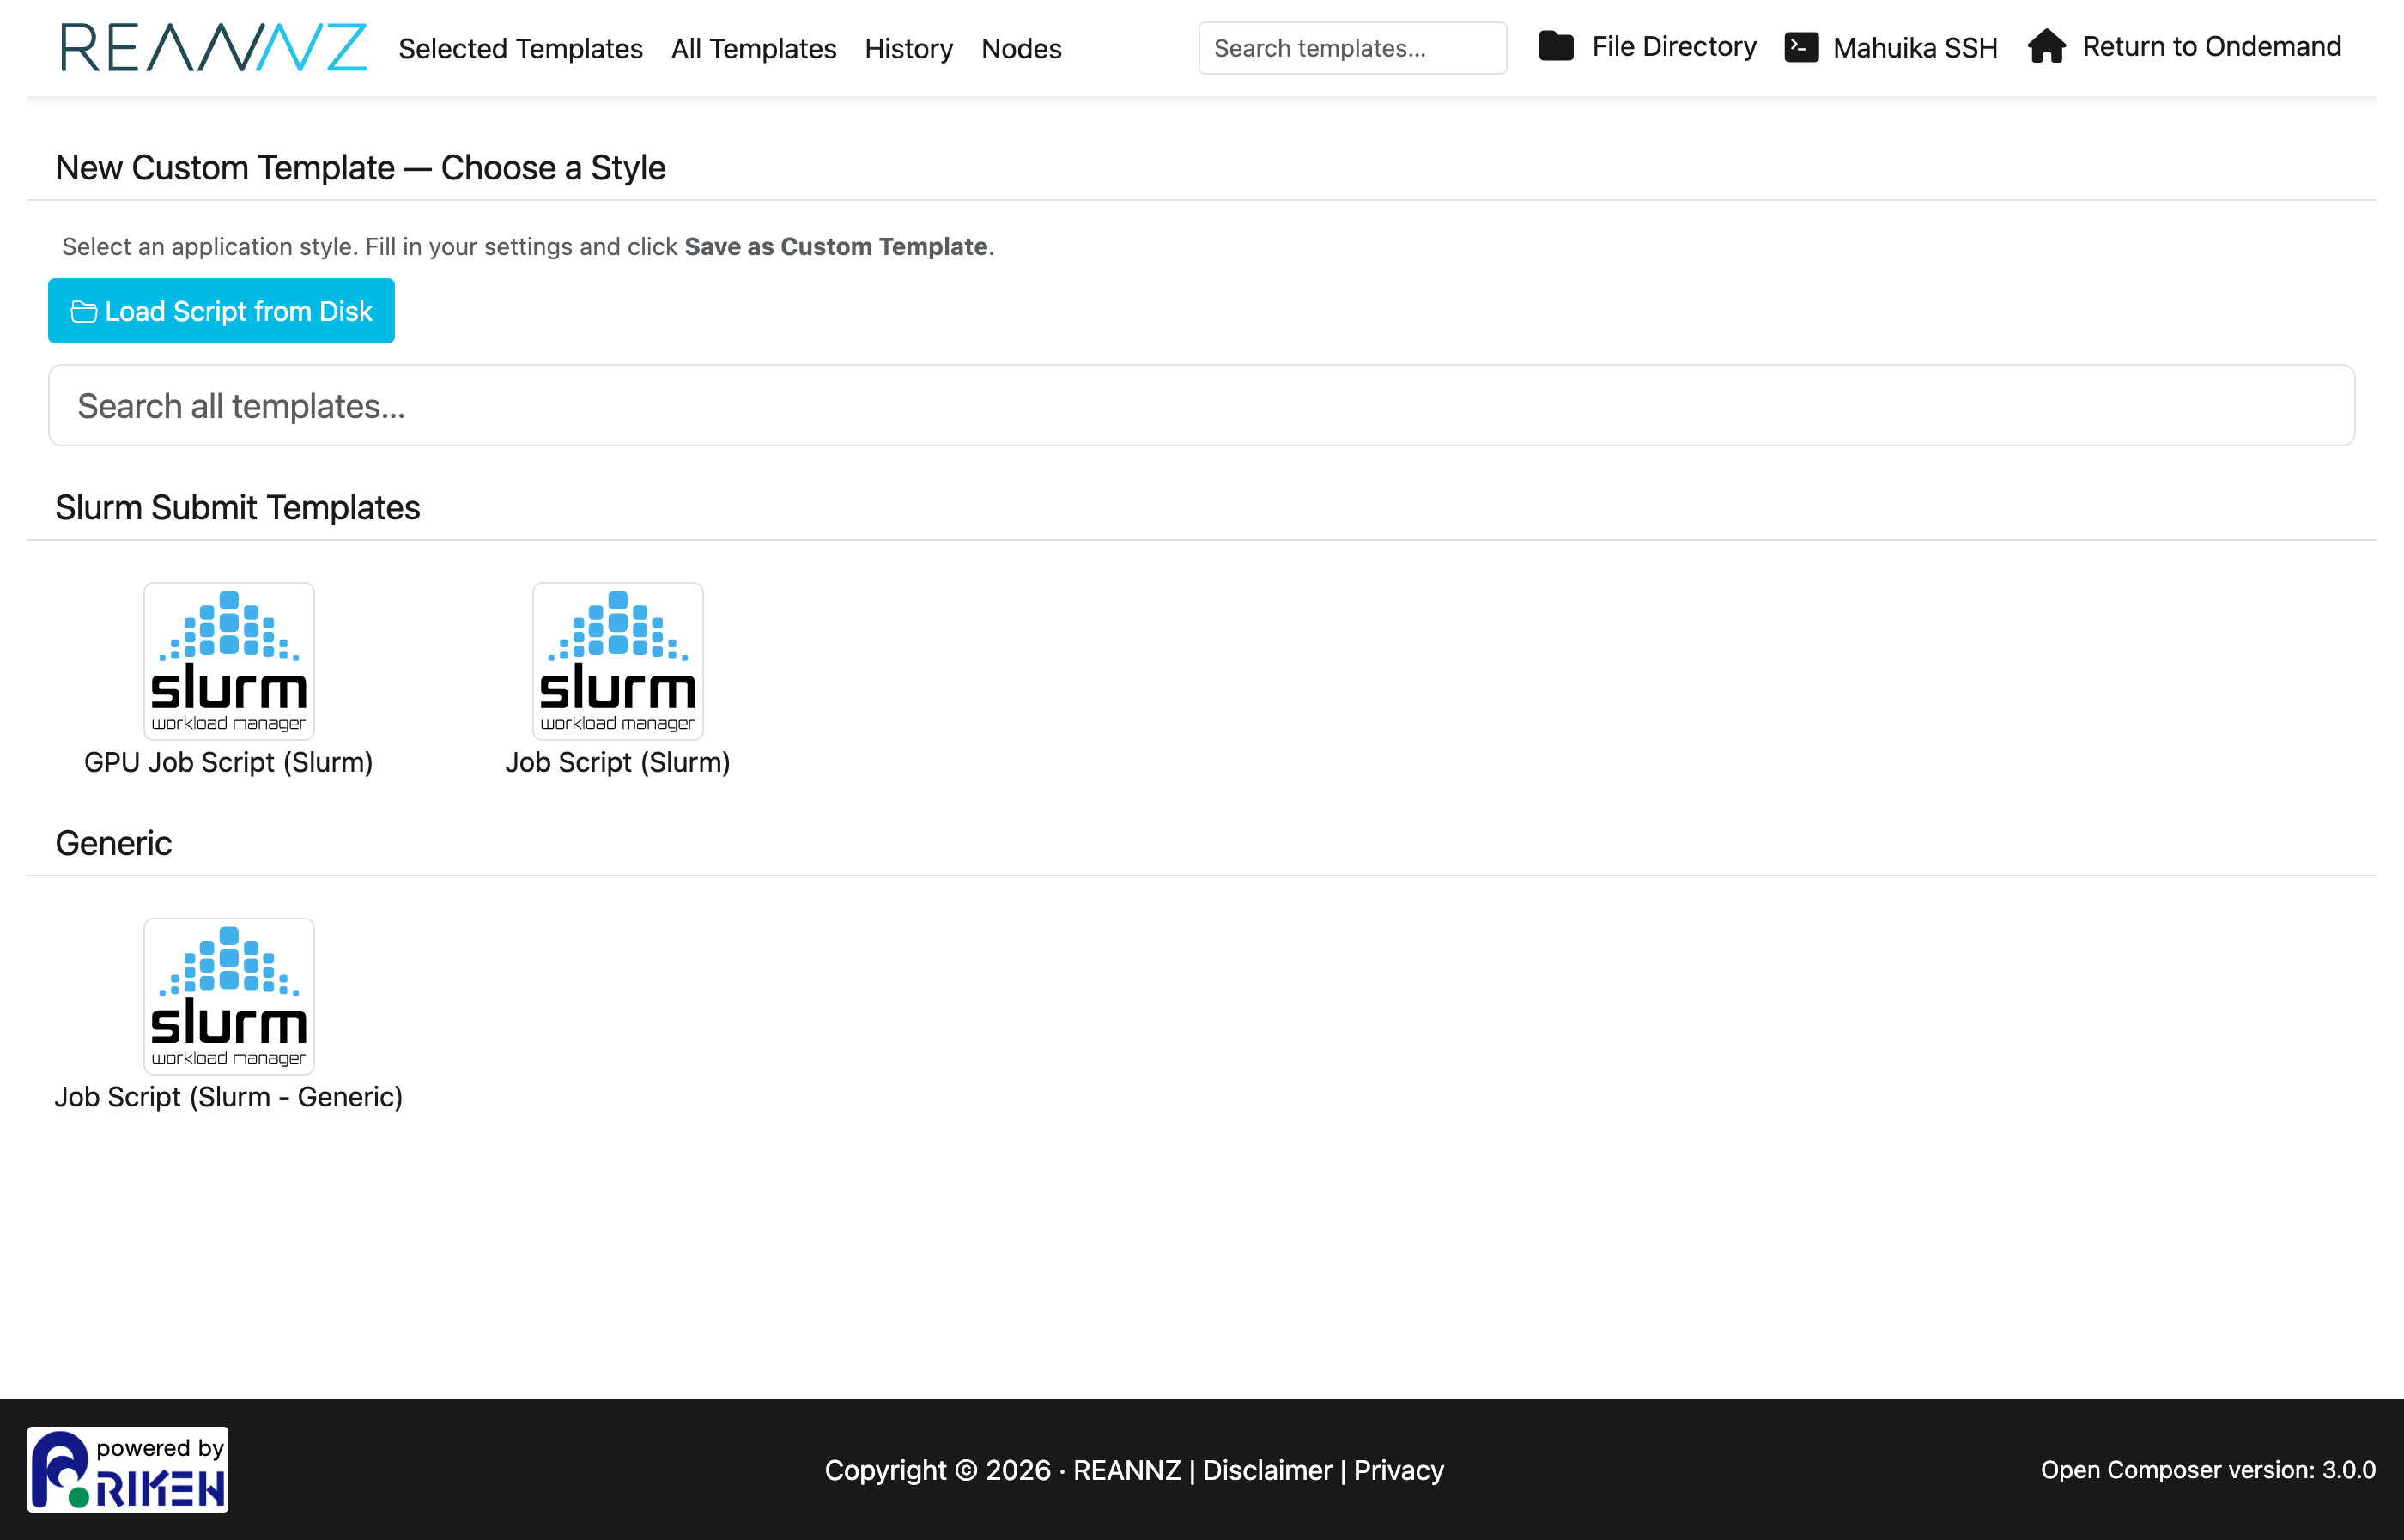
Create a new script
Click New Script to start a new one. This opens a template picker listing every template — with Job Script (Slurm) and GPU Job Script (Slurm) at the top — which you can narrow with the search box at the top right of the screen.
Pick a template and its form opens ready to fill in, with the Script location already set to the folder you were browsing.
My Custom Templates
Custom templates let you save a job configuration and reuse it later, so you do not have to fill in the form from scratch each time.
-
Create one by clicking + New Custom Template, choosing a style, filling in your settings and clicking Save as Custom Template.
-
Reuse one by clicking its tile on the home page — the form opens pre-filled with your saved values.
- Edit the name/description with the pencil icon, or delete it with the red ✕ on its tile.
- Search your templates with the box next to + New Custom Template.
- Reorder them by dragging the tiles with your mouse; the order is remembered.
Tracking jobs (History)
The History page lists the jobs you have submitted, with their status, start/end times, script location and output/error files.
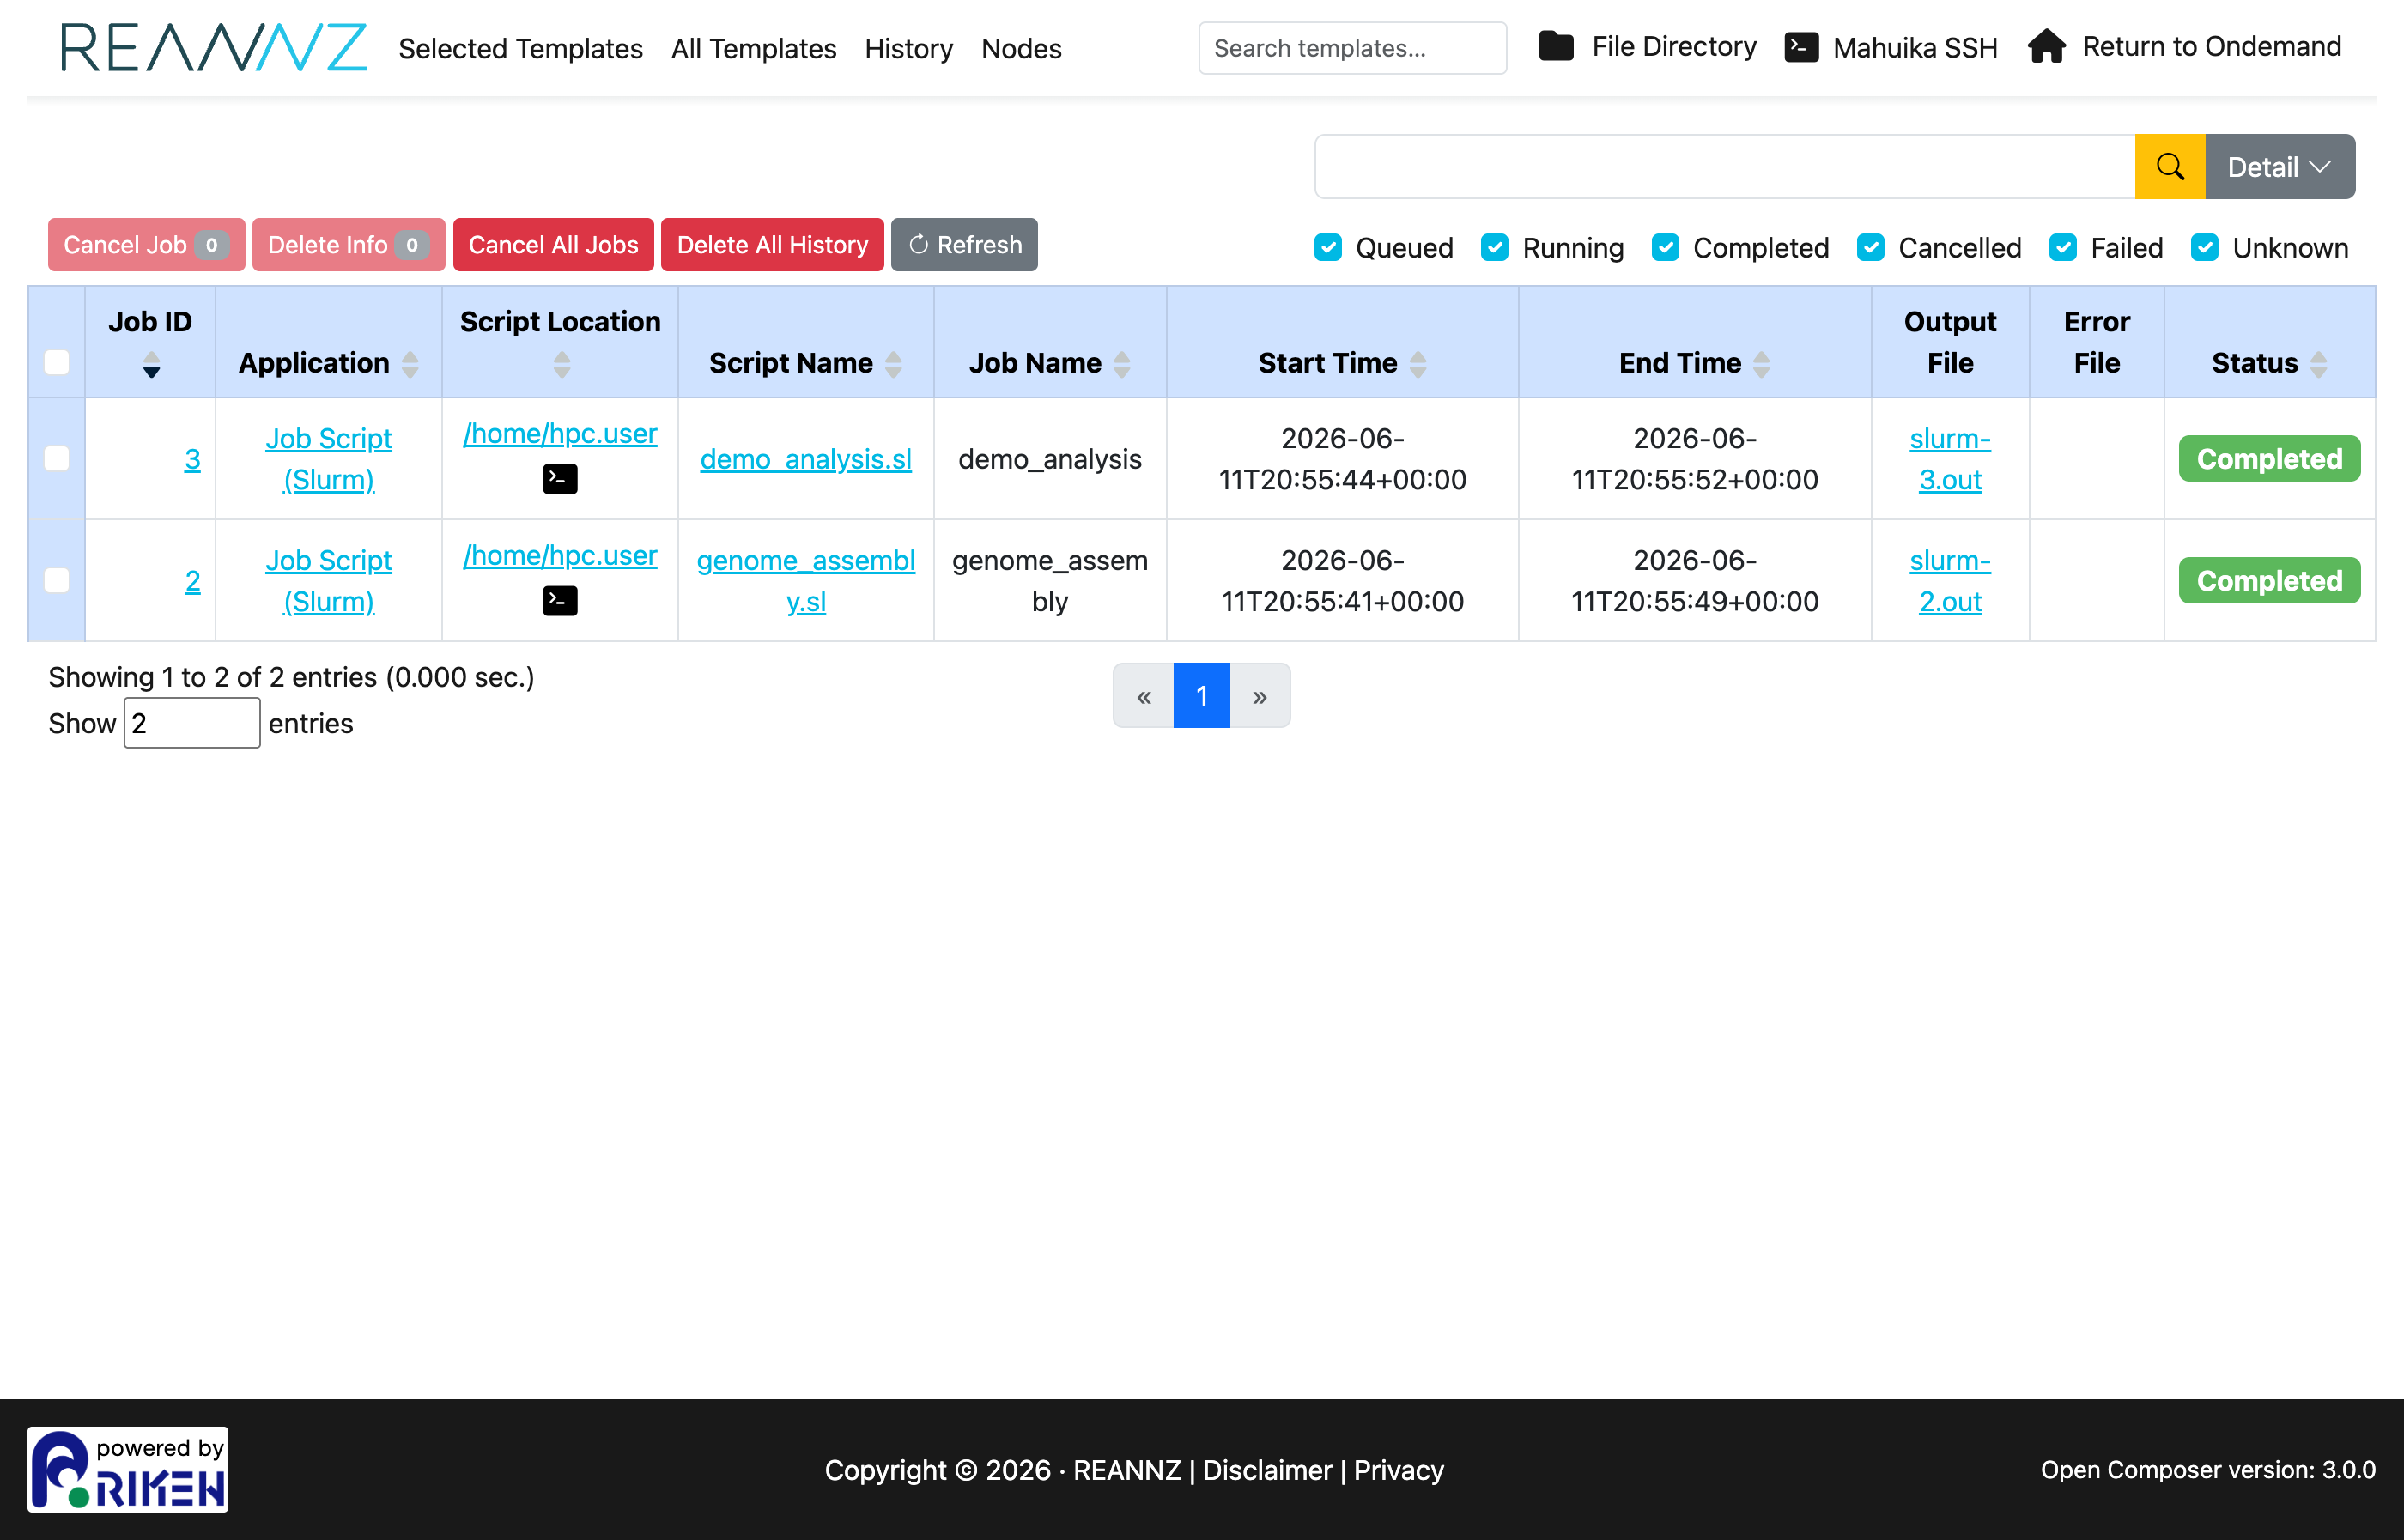
From here you can:
- Filter by status (Queued, Running, Completed, Cancelled, Failed) with the checkboxes.
- Click a Job ID or Script Name to view details, or open the Output File / Error File.
- Cancel a running job, or remove entries with Delete Info / Delete All History.
- Refresh to update statuses.
Viewing a job's script
Click a job's Script Name to open the Job Script window, which shows the exact script that was submitted:
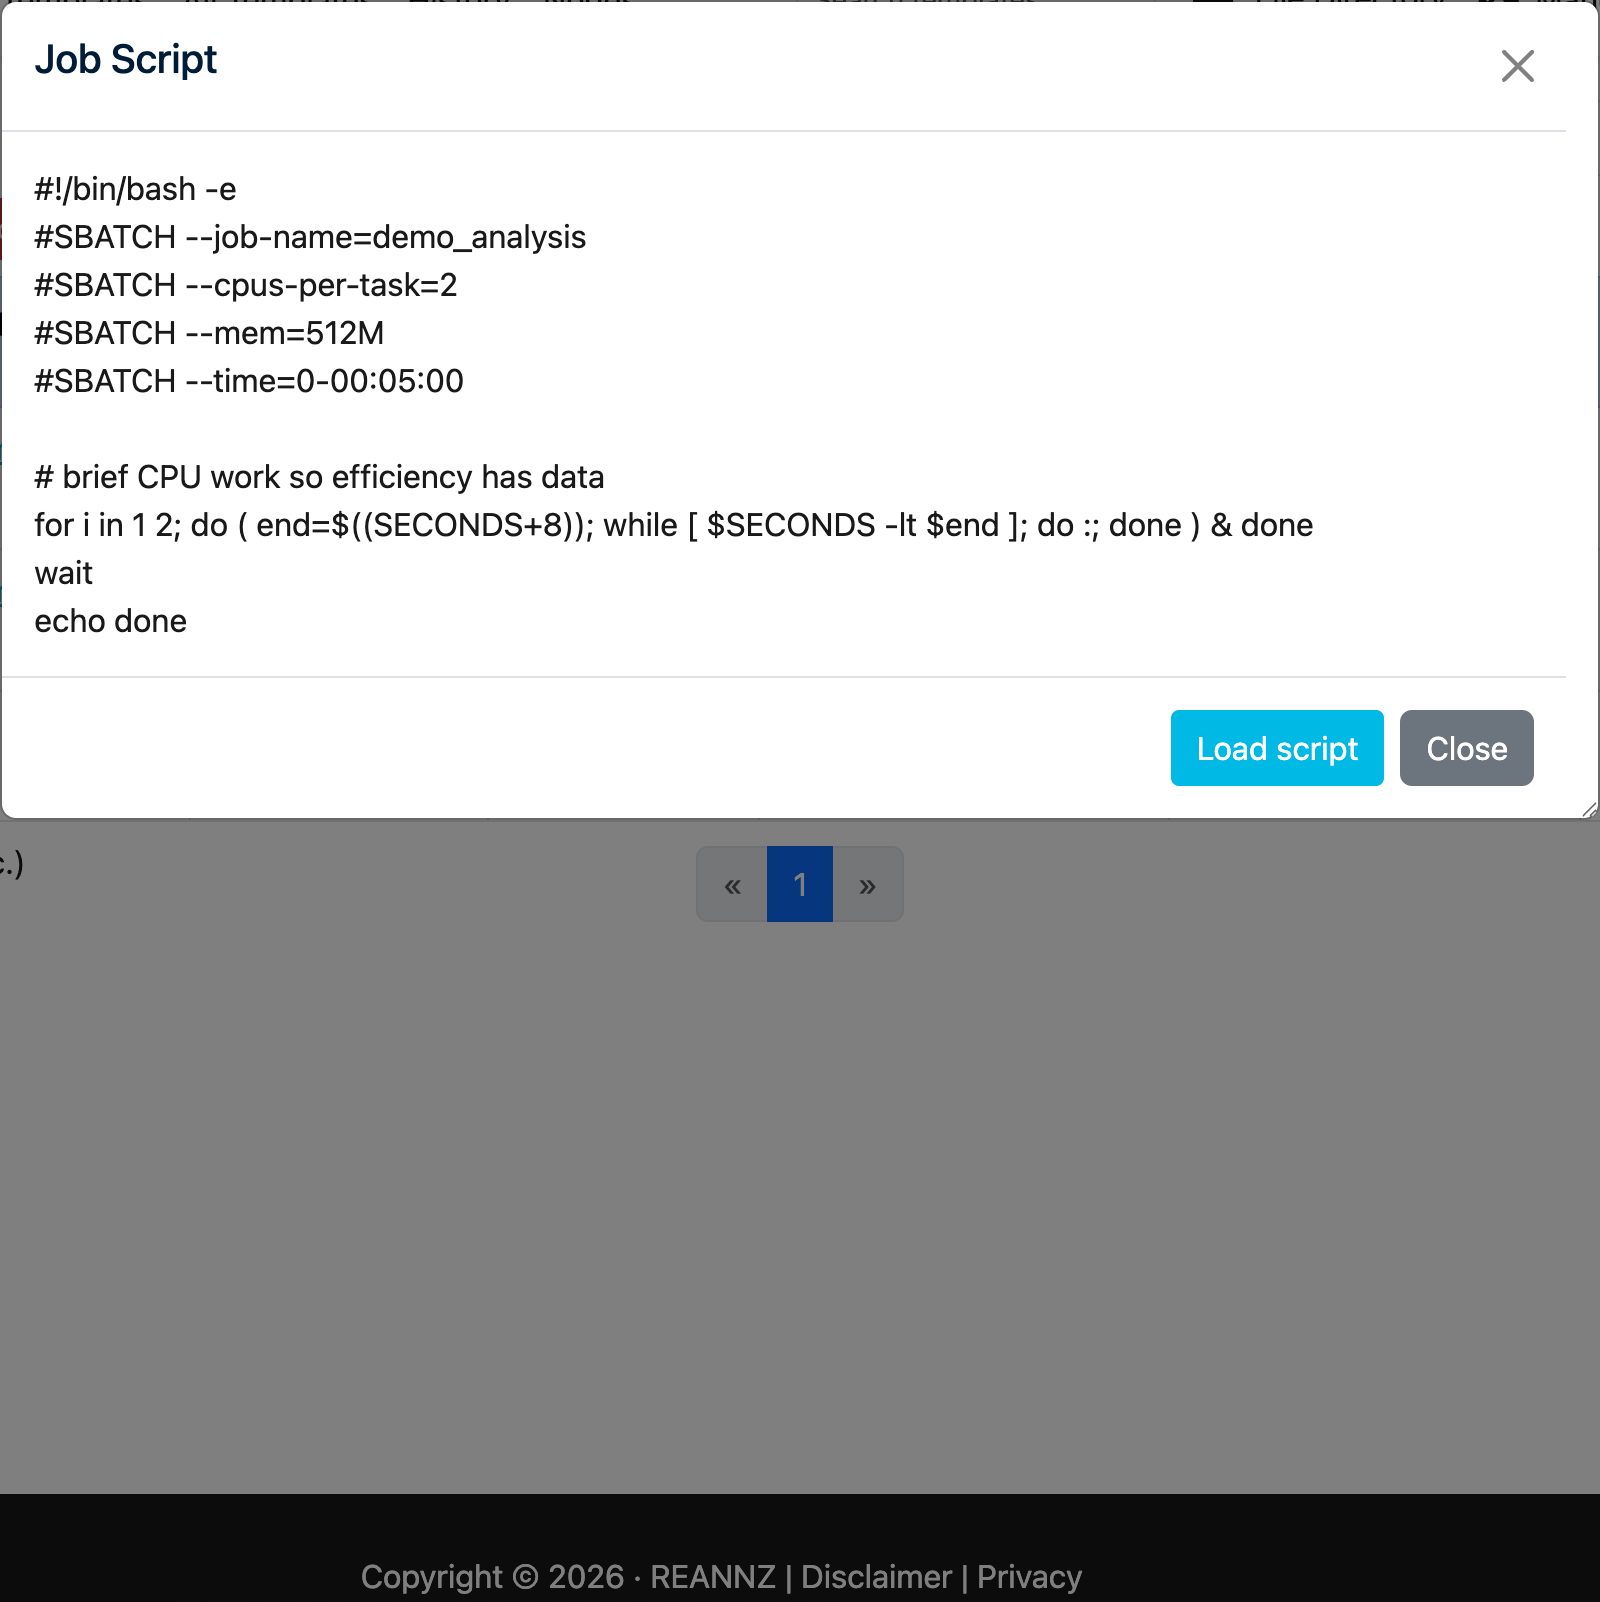
Click Load script to reopen the job in the form with its values filled in — handy for re-running it or using it as the basis for a new job.
Checking your job's efficiency
For a job that has finished (Completed, Failed or Cancelled), click its Job ID to open the Job Details window. At the bottom, under Job Efficiency (seff), you can see how much of what you requested the job actually used:
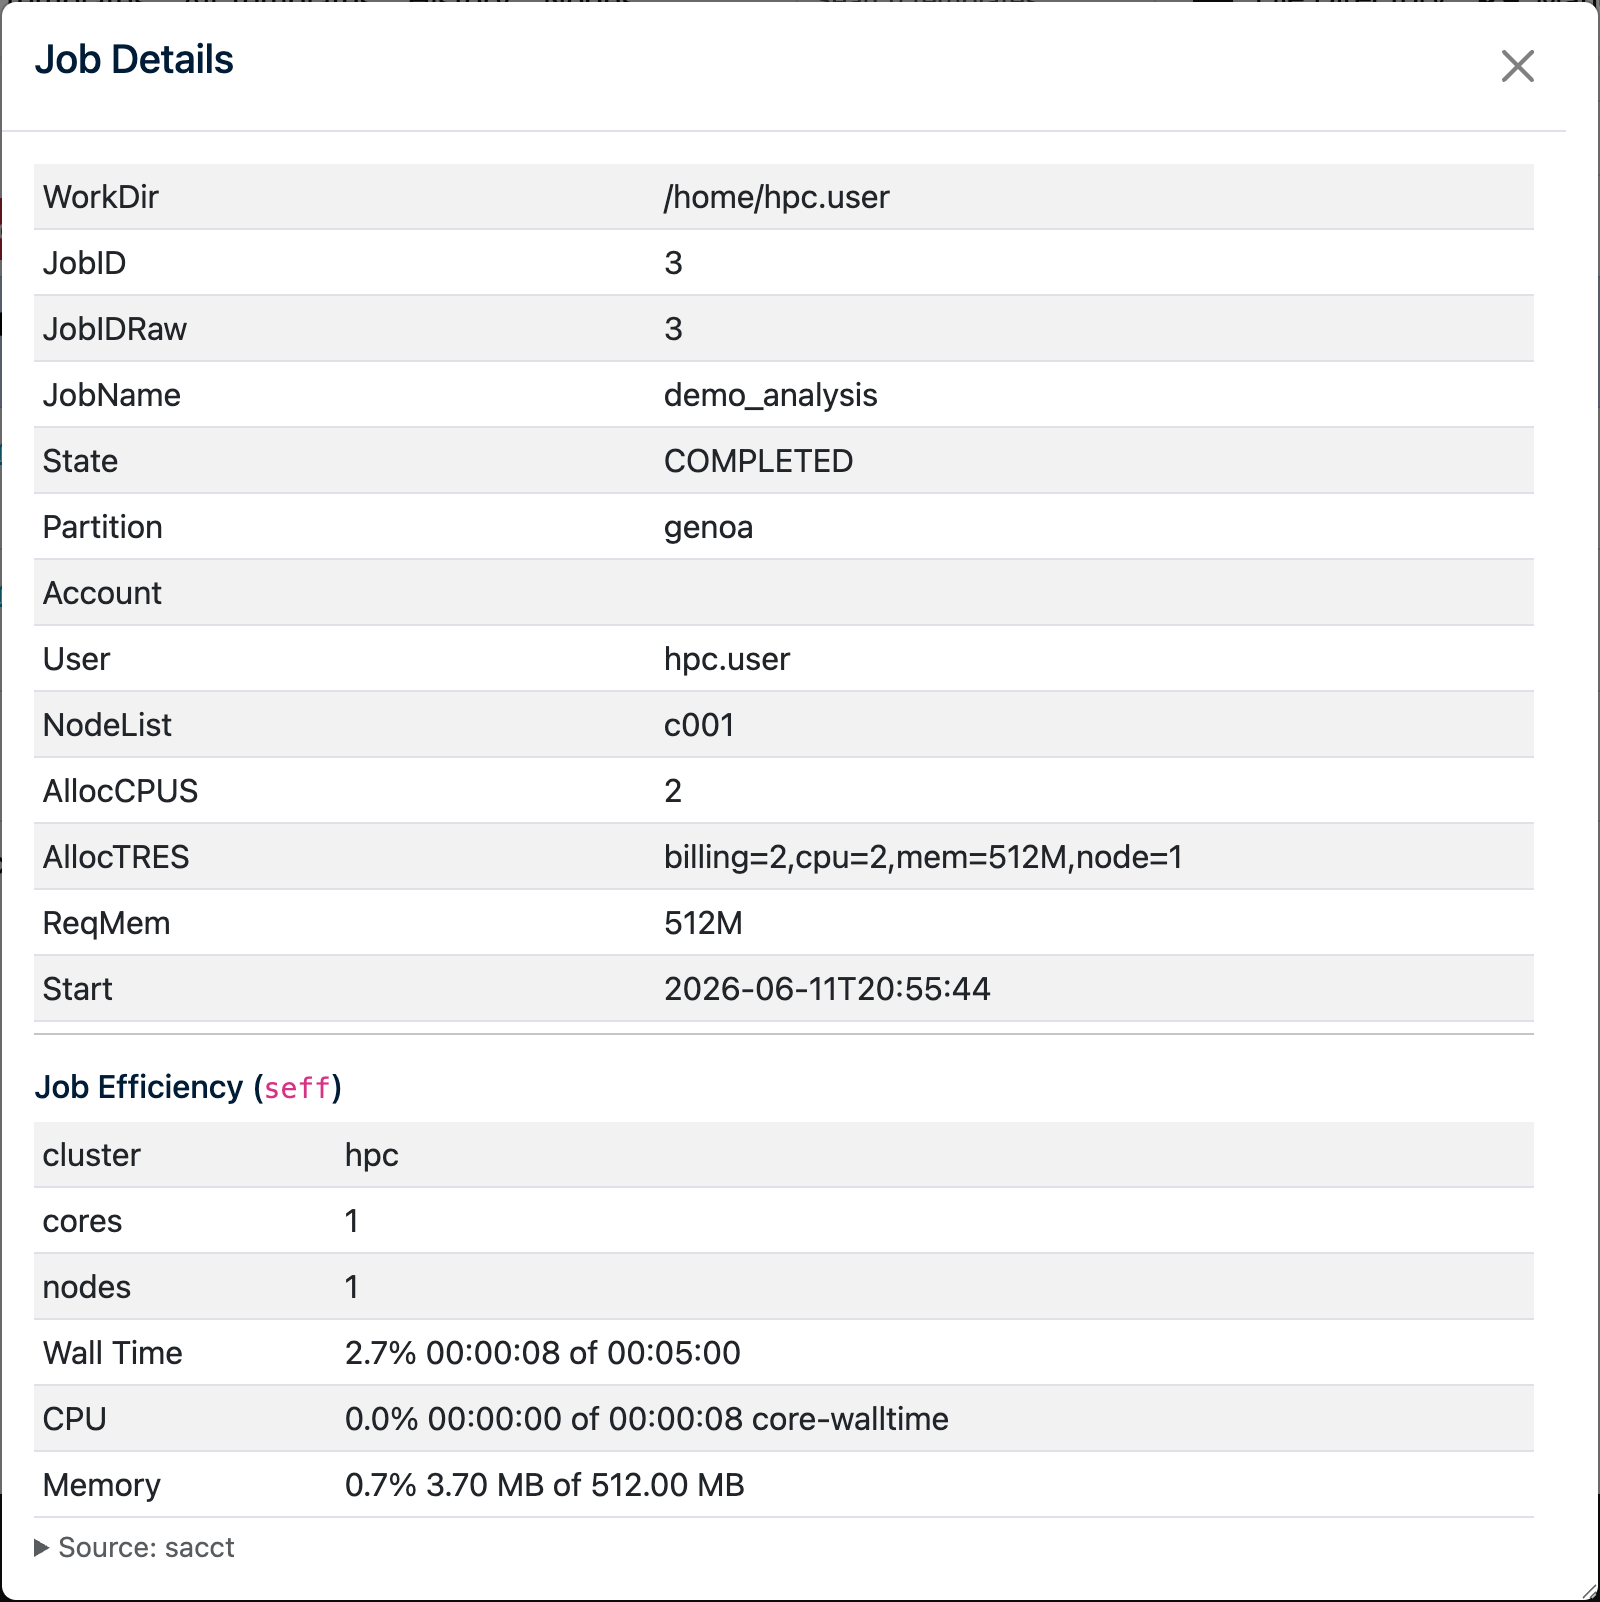
Each row shows a percentage followed by used of requested:
- Wall Time — how long the job ran versus the time limit you set (
--time). In the example above the job ran for 8 seconds of a 5-minute limit (2.7%). - CPU — how much CPU work was done versus the cores × runtime you reserved (the core-walltime). A low value usually means you asked for more cores than the job could keep busy.
- Memory — the peak memory used versus the memory you requested (
--mem). Here only 3.70 MB of 512 MB was used (0.7%). - GPU Utilisation / GPU Memory — shown for GPU jobs, indicating how hard the GPU and its memory were worked.
Right-size your next job
Use these numbers to adjust your next submission. If Memory sits well below 100%, lower Total Memory (GB); if CPU efficiency is low, request fewer CPUs; and if Wall Time is a small fraction of your limit, shorten the time request. Asking for closer to what you actually use means your jobs start sooner and leave resources free for others. If you are unsure about how to improve these numbers, contact Mahuika Support and we will be happy to help.
Checking node availability (Nodes)
The Nodes page shows the current state of the cluster's compute nodes — how many CPUs, how much memory and which GPUs are free versus in use.
Getting help
If you run into problems, see the OnDemand troubleshooting guide or contact Mahuika Support.